WW1 / WW2 / 20th Century

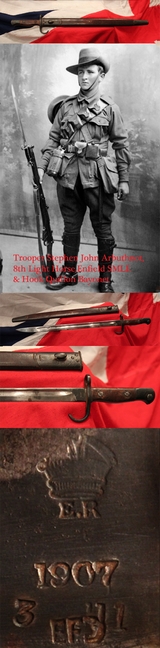
The Rarest Enfield 'Hook Quillon' 1907 Pattern Bayonet Issued in 1911
Probably for many collectors, especially Australian, it is the most desirable and rarest regulation bayonet ever made or issued. This is an original 1907 Pattern SMLE sword bayonet, but, most importantly, it is the early example, with its long hook quillon still intact. The adapted removed or shortened type outnumber the rare original hook quillon type, probably, by several tens of thousand to 1. This example was made in 1911, bearing it's original King Edwards Crown, with ER stamp and Enfield maker stamp. And as was standard issue to the WW1, ANZAC, Australian Light Horse. The hook quillon SMLE issue bayonet, is a the very pinnacle of Great War bayonet collecting. They were used predominantly by the Australian Infantry and Light Horse Brigade in WW1, and due to their use in Gallipoli and the dessert were never returned to the ordnance for regulatory quillon removal as was instructed. In over 45 years we have had barely a handful of these rarest full hook quillon bayonets in original condition and unaltered, but the regular type we have handled, by comparison, many many thousands in the same period of time. Australian Light horse were like mounted infantry in that they usually fought dismounted, using their horses as transport to the battlefield and as a means of swift disengagement when retreating or retiring. A famous exception to this rule though was the charge of the 4th and 12th Light Horse Regiments at Beersheba on 31 October 1917. In 1918, some light horse regiments were equipped with sabres, enabling them to fight in a conventional cavalry role in the advance on Damascus. However, unlike mounted infantry, the light horse also performed certain cavalry roles, such as scouting and screening, while mounted.
The light horse were organised along cavalry rather than infantry lines. A light horse regiment, although technically equivalent to an infantry battalion in terms of command level, contained only 25 officers and 400 men as opposed to an infantry battalion that consisted of around 1,000 men. Around a quarter of this nominal strength (or one man in each section of 4) could be allotted to horse-holding duties when the regiment entered combat. A regiment was divided into three squadrons, designated "A", "B" and "C" (equivalent to a company), and a squadron divided into four troops (equivalent to but smaller than a platoon). Each troop was divided into about 10 four-man sections. When dismounting for combat, one man from each section would take the reins of the other three men's horses and lead them out of the firing line where he would remain until called upon. By the outbreak of World War I, there were 23 light horse regiments within Australia's part-time military force, consisting of 9,000 personnel. These were organised as follows:
1st Light Horse Brigade (Queensland): 1st (Central Queensland), 2nd (Queensland Mounted Infantry), 3rd (Darling Downs), 4th (Northern Rivers Lancers) and 27th (North Queensland) Light Horse Regiments
2nd Light Horse Brigade (New South Wales): 5th (New England) and 6th (Hunter River Lancers) Light Horse Regiments
3rd Light Horse Brigade (New South Wales): 7th (New South Wales Lancers), 9th (New South Wales Mounted Rifles), 11th (Australian Horse) and 28th (Illawarra) Light Horse Regiments
5th Light Horse Brigade (Victoria): 13th (Gippsland), 15th (Victorian Mounted Rifles), and 16th (Indi) Light Horse Regiments
7th Light Horse Brigade (Victoria): 17th (Campaspe), 19th (Yarrowee), and 20th (Corangamite) and 29th (Port Phillip Horse) Light Horse Regiments
8th Light Horse Brigade (South Australia): 22nd (South Australian Mounted Rifles), 23rd (Barossa), and 24th (Flinders) Light Horse Regiments
25th (Western Australian Mounted Infantry) Light Horse Regiment
26th (Tasmanian Mounted Infantry) Light Horse Regiment. The bayonet has excellent markings to the blade and it's scabbard leather but the any surviving regt markings on the steel hilt mounts are now fully obscured by age. read more
895.00 GBP
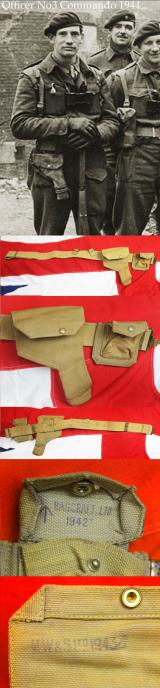
A Scarce Original WW2 British '37 Pattern Commando Officer's 9mm Browning Hi-power Holster, Ammunition Pouch & Waistbelt 1942/3 in Excellent Plus Condition
This 3 commando holster set was acquired with a German Luftwaffe officers PPK holster but sold seperately. After WW2 the officer kept his Browning and the Walther PPK as souvenirs, but surrendered his Browning and the Walther to the police in the 1960's. We acquired both holsters from his grandson
The 9mm automatic holster was easily identifiable by its level top edge almost all revolver holsters being angled upwards. With top hooks to connect underneath an ammunition pouch as an option. The neat ammunition pouch could accommodate two 12 round packets, a fabric strip went over the brace adaptor and a fabric loop fitted at the bottom accepted the top hook of a holster. dated 42/43.
No. 3 Commando was a battalion-sized Commando unit raised by the British Army during the Second World War. Formed in July 1940 from volunteers for special service, it was the first such unit to carry the title of "Commando". Shortly afterwards the unit was involved in a largely unsuccessful raid upon the German-occupied Channel Island of Guernsey.
In 1941 they were involved in successful raids on the Lofoten Islands and Vaagso, in Norway, before taking part in the costly Dieppe raid in August 1942, where the unit was tasked with knocking out a German coastal artillery battery on the eastern flank of the main landings, although due to a chance encounter in the Channel with a German convoy, a large majority of the unit failed to make it ashore.
In early 1943, the unit was sent to Gibraltar before moving to North Africa in April from where they were involved in the Allied invasion of Sicily and operations in Italy prior to being withdrawn to Britain to prepare for Operation Overlord. On D-Day they went ashore on 6 June 1944 as part of the 1st Special Service Brigade tasked with linking up with the 6th Airborne Division on the eastern flank of Sword before being withdrawn. Later they took part in the Allied counterattack during the Ardennes Offensive in early 1945 before taking part in the advance into Germany as part of Operation Plunder.
Following the end of the war, No. 3 Commando carried out occupation duties in Germany before it was disbanded on 4 January 1946. read more
190.00 GBP

Aircrew Europe Six Medal Group, With Africa Star and 1942-43 Bar, 13th Squadron Observer, Operation Jubilee, 19/8/1942, the Dieppe Raids, with His Observer Wing {x 2} Dog Tags, Cap Badge and Silver Plate & Enamel Observer Badge
Of Sgt F.H. Westbrook -(Observer-13 Sqn)-
Operation Jubilee or the Dieppe Raid (19 August 1942) was an Allied amphibious attack on the German-occupied port of Dieppe in northern France, during the Second World War. Over 6,050 infantry, predominantly Canadian, supported by a regiment of tanks, were put ashore from a naval force operating under protection of Royal Air Force (RAF) fighters.
The port was to be captured and held for a short period, to test the feasibility of a landing and to gather intelligence. German coastal defences, port structures and important buildings were to be demolished. The raid was intended to boost Allied morale, demonstrate the commitment of the United Kingdom to re-open the Western Front and support the Soviet Union, fighting on the Eastern Front.
Aerial and naval support was insufficient to enable the ground forces to achieve their objectives; the tanks were trapped on the beach and the infantry was largely prevented from entering the town by obstacles and German fire. After less than six hours, mounting casualties forced a retreat. The operation was a fiasco in which only one landing force achieved its objective and some intelligence was gathered (including electronic intelligence).
Within ten hours, 3,623 of the 6,086 men who landed had been killed, wounded or became prisoners of war. The Luftwaffe made a maximum effort against the landing as the RAF had expected, but the RAF lost 106 aircraft (at least 32 to anti-aircraft fire or accidents) against 48 German losses. The Royal Navy lost 33 landing craft and a destroyer.
Both sides learned important lessons regarding coastal assaults. The Allies learned lessons that influenced the success of the D-Day landings. Artificial harbours were declared crucial, tanks were adapted specifically for beaches, a new integrated tactical air force strengthened ground support, and capturing a major port at the outset was no longer seen as a priority. Churchill and Mountbatten both claimed that these lessons had outweighed the cost. The Germans also believed that Dieppe was a learning experience and made a considerable effort to improve the way they defended the occupied coastlines of Europe.
Fighter Command claimed to have inflicted many losses on the Luftwaffe for an RAF loss of 106 aircraft, 88 fighters (including 44 Spitfires), 10 reconnaissance aircraft and eight bombers; 14 other RAF aircraft were struck off charge from other causes such as accidents.79 Other sources suggest that up to 28 bombers were lost and that the figure for destroyed and damaged Spitfires was 70.80 The Luftwaffe suffered 48 aircraft losses, 28 bombers, half of them Dornier Do 217s from KG 2; JG 2 lost 14 Fw 190s and eight pilots killed, JG 26 lost six Fw 190s with their pilots.81 The RAF lost 91 aircraft shot down and 64 pilots; 47 killed and 17 taken prisoner, the RCAF lost 14 aircraft and nine pilots and 2 Group lost six bombers.57h Leigh-Mallory considered the losses "remarkably light in view of the number of Squadrons taking part and the intensity of the fighting" noting that the tactical reconnaissance suffered heaviest with about two casualties per squadron.83 The Luftwaffe in France was back to full strength within days of the raid. Copp wrote that Dieppe failed to inflict the knockout blow against the Luftwaffe that the RAF sought. Although the Allies continued to lose on average two aircraft for every one German aircraft destroyed for the rest of 1942, the output of fighters by the United States, Britain and Canada combined with better Allied pilot training, led to the Luftwaffe gradually losing the war of attrition in the skies above France. Copp concluded that: "The battle for air superiority was won on many fronts by continuous effort and August 19, 1942 was part of that achievement".57 The Forward Air Controller, Air Commodore Adrian Cole, was injured when Calpe was attacked and was awarded the DSO for gallantry.
Every single item from The Lanes Armoury is accompanied by our unique Certificate of Authenticity. Part of our continued dedication to maintain the standards forged by us over the past 100 years of our family’s trading, as Britain’s oldest established, and favourite, armoury and gallery read more
795.00 GBP
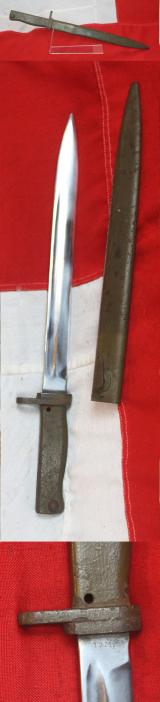
A Scarce German WW1 Ersatz Gew 98 Bayonet
One of the more collectable emergency production bayonets supposedly made in the last year of the war, however there is evidence that many were made from the early war period. EB10 type 4 scabbard
Excellent bright polish blade condition, much original green surface over paint present
Ersatz (substitute) bayonets were made in Germany during the early years of World War I, because there weren't enough regulation bayonets to equip the rapidly expanding army. Ersatz bayonets were manufactured in local workshops, resulting in hundreds of variations. I only have a small number of examples, however, these should aid in making a general identification. The German specification was for a 12-inch blade. In addition to newly-constructed bayonets, Ersatz Bayonets were also created by modifying captured bayonets of other countries.
12 " blade
Every single item from The Lanes Armoury is accompanied by our unique Certificate of Authenticity. Part of our continued dedication to maintain the standards forged by us over the past 100 years of our family’s trading, as Britain’s oldest established, and favourite, armoury and gallery read more
220.00 GBP

Gold Metal Watch Fob, With a Zeppelin Model Top Mount Representing The Hindenburg Zeppelin, Gifted by Kapitan Max Pruss, Kapitan of the Ill Fated Zeppelin Airship LZ.129 Hindenburg. & the Hindenburg Kapitan's Saucer
Apparently given by Kapitan Max Pruss, the last Kapitan of the Hindenburg, accompanied with his boxed, original, WW2 Luftwaffe pilot's Leitz goggles, and his personal, named ‘Hindenburg’ porcelain saucer, not to be confused with the LZ standard livery porcelain, to a visiting British RAF officer in the 1950's, while he was attempting to resurrect with the post-war German government, his new Zeppelin project, with his former Hindenburg Chief Engineer, Rudolf Sauter. The fob is very heavy quality, and weighs as it should if it was solid gold, however, it bears no gold hallmark, so we cannot sell it as solid gold, and we cannot thus assume it is solid gold, therefore we offer it as ‘gold coloured metal’. The fitted Zeppelin miniature model top mount is certainly gold plate as the plate is fractionally worn in places. He Sauter worked with Captain Max Pruss, the Hindenburg's former commander, during the post-war years to try and revive the Zeppelin airships. In the early 1950s, in fact, Sauter and Pruss drew up plans for a new Zeppelin and made the case to the West German government and the press that (in Sauter's words,) "The use of Zeppelins in air traffic is absolutely economical. The West German government is planning to spend 150 million marks on a new airline flown by airplanes. We would need only 50 million marks to build new Zeppelins." Sauter showed the new Zeppelin plans to Dr. Hugo Eckener, by then in his late 80s and retired. As Eckener later told a news reporter, "I told him that he had my blessing, but that I do not want to have anything to do with it. Today, a Zeppelin would not have a chance against an airplane.". More photos of the fob and saucer to follow tomorrow. One photo in the gallery Is of Kapitan Pruss, with a fellow Kapitan Von Schiller colleague making a time check while aboard the Hindenburg.
Kapitan Pruss commanded the Zeppelin airship, Hindenburg, during its tragic explosion and destruction in Lakehurst, America. Amazingly he survived but with severe burns.
The Hindenburg disaster was an airship accident that occurred on May 6, 1937, in Manchester Township, New Jersey, United States. The German passenger airship LZ 129 Hindenburg caught fire and was destroyed during its attempt to dock with its mooring mast at Naval Air Station Lakehurst. The accident caused 35 fatalities (13 passengers and 22 crewmen) from the 97 people on board (36 passengers and 61 crewmen), and an additional fatality on the ground.
The disaster was the subject of newsreel coverage, photographs and Herbert Morrison's recorded radio eyewitness reports from the landing field, which were broadcast the next day.A variety of hypotheses have been put forward for both the cause of ignition and the initial fuel for the ensuing fire. The publicity shattered public confidence in the giant, passenger-carrying rigid airship and marked the abrupt end of the airship era.
We also have a souvenir German porcelain Hindenburg saucer from the captain’s personal porcelain set, said by Pruss to have been given to him by Hitler’s deputy, Herman Goring, however, if so, this must have been before the dramatic argument and falling out between Goring and Pruss at Frankfurt Airport in 1940.
Pruss was the commander of the airship during the Hindenburg disaster of 6 May 1937. This was his first time commanding a trip to Lakehurst. Pruss and several crew members rode the Hindenburg down to the ground as it burned, then ordered everybody out. He carried radio operator Willy Speck out of the wreckage, then looked for survivors until rescuers were forced to restrain him. Pruss, however, suffered extensive burns and had to be taken out by ambulance to Paul Kimball Hospital in Lakewood. The burns were so extensive that he was given last rites, but although his face was disfigured for the rest of his life, his condition improved over the next few months. Pruss was unable to testify at investigative committees, but officially he was not held responsible.
Pruss, along with other airship crewmen, maintained that the disaster was caused by sabotage, and dismissed the possibility that it was sparked by lightning or static electricity. Although Hugo Eckener did not rule out other causes, he criticized Pruss' decision to carry out the landing in poor weather conditions, expressing his belief that sharp turns ordered by Pruss during the landing approach may have caused gas to leak, which could have been ignited by static electricity. Pruss insisted that such turns were normal procedure, and that the stern heaviness experienced during the approach was normal due to rainwater being displaced at the tail.
Apparently Kapt. Pruss was exceptionally polite, and the exchange of gifts was most warmly given and received. read more
995.00 GBP

An Amazing Original Souvenir of Tank Warfare in WW2. A German 88mm Tiger Tank Shell, Superior Early War Brass Case Type, High Explosive, Ground Combat, Impact Fuze AZ23
Shell case in brass and dated Photo in the gallery of Hitler inspecting different forms of 88mm rounds. Rare German WW2 88mm Shell Used by the German 88 mm Cannon during WW2. A simply superb example, impact fuze AZ23 with a 1938 brass shell case. The world famous 88's were the bane of the Allies in WW2. The 88 millimetre cannon and the Tiger Tank 88 cannons fired these huge shells. Superb maker codes stamps etc. with full Waffenamt Nazi Eagle markings. To get an impression of the difference between the size and power of Allied shells against the German equivalent, in 1942 an Allied Tank Round was approximately the size of a small Coca Cola bottle, the German Tank Shell was the size of a small child!. The 88 performed well in its original role of an anti-aircraft gun, and it proved to be a superb anti-tank, and anti-soft skinned vehicle gun as well. Its success was due to its versatility: the standard anti-aircraft platform allowed gunners to depress the muzzle below the horizontal, unlike most of its contemporaries. During the initial stages of the war, as it was becoming increasingly clear that existing anti-tank weapons were unable to pierce the armour of heavier enemy tanks, gunners were more likely to put the weapon to use against enemy tanks, a situation that was aided by the prevalence of the 88 among German forces.
Similarly to the anti-aircraft role, as an anti-tank weapon the 88 was tactically arranged into batteries, usually four guns to each. The higher-level tactical unit was, most commonly, a mixed anti-aircraft battalion (Flak-Abteilung, gemischte). It totalled 12 such guns on average, supplanted by light cannons.
The German Condor Legion made extensive use of the 88 in the Spanish Civil War, where its usefulness as an anti-tank weapon and a general artillery piece exceeded its role as an anti-aircraft gun.The success of the 88 caused the Allies to take steps to defend against it in new tank designs. On July 18 and 19 1944 a Luftwaffe 8.8 cm anti-aircraft battery was re-purposed by then Major Hans von Luck to attack British tanks near Cagny taking part in Operation Goodwood. 20 tanks were killed by these guns within the first few seconds and at least 40 tanks were knocked out by 88's during the engagement.
Not suitable to export, for sale to over 18s only, safe inert and empty 37 inches high read more
1275.00 GBP
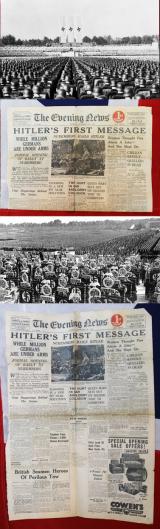
Front Page of the Evening News Sept 6th 1938. 'Hitler's First Message', From the Nuremberg Rally
A most intriguing original historical souvenir of Hitler's National Socialist pre-war Germany in 1938 during his rise to power, and the start of his imminent move to all out total war, and the destruction of freedom throughout all Europe.
5-12 September 1938. Nuremberg. The last X Party Rally called ‘Reichsparteitag Großdeutschland’ (The Congress of Great Germany) once again praised the triumphs of the Third Reich, including the Annexation of Austria six months before. The grand opening was accompanied by Wagner’s ‘Meistersinger von Nürnberg’ opera to inspire Hitler himself and Goebbels with enthusiasm. This Party Congress was the last of that kind as the XI Rally, pre-planned as the “The Party Conference of Peace” for September 1939 was denied on the threshold of the invasion of Poland.
Nürnberg Rally, the massive Nazi Party rallies held in 1923, 1927, and 1929 and annually from 1933 through 1938 in Nürnberg (Nuremberg) in Bavaria. The rallies were primarily propaganda events, carefully staged to reinforce party enthusiasm and to showcase the power of National Socialism to the rest of Germany and the world.
The emotional power generated by the rallies has been preserved in films, most notably in Leni Riefenstahl’s classic Triumph des Willens (1935; Triumph of the Will), which presents a carefully orchestrated version of the 1934 rally.
The paper has discoloured areas and the left hand side is hand torn, but its interest in a historical context more that makes up for it. It would be ideal for framing read more
95.00 GBP

An Excellent, WW1 Wilkinson Sword 1897 Pattern Infantry Officers King George Vth Period. Used In WW1 & WW2 Yet Still Perfect For Use Today
Apparently completely refurbished by Wilkinson sword around 20 years ago.
We just acquired effectively the full set of British Infantry swords used from 1895 onwards. The Victorian 1895 pattern by Wilkinson, a Victorian 1897 pattern by Robert Mole from the British Raj in India, a King George Vth, by Wilkinson, in its WW1 FS scabbard, and a King George Vth 1897 pattern Wilkinson sword in its dress scabbard, from WW1, but also used in WW2 and still perfectly usable today, by an officer in the current service of H.M.King Charles IIIrd
This sword was used in WW1 and WW2 and due to its condition it is perfectly suitable for current service use in the army today. Pristine hilt, traditional wire bound sharkskin grip, fully etched with royal cypher and traditional devices, excellent fully bright blade also now pristine, and superb full dress scabbard. Traditional pierced half basket hilt with the cypher of King George Vth. In parade ground condition almost as it was when it was made in WW1.
The 1897 pattern Infantry officer's sword has remained unchanged to the present day.
By the time of its introduction, the sword was of limited use on the battlefield against rapid-firing rifles, machine guns and long-range artillery. However, the new sword was regarded, when needed, as a very effective fighting weapon. Reports from the Sudan, where it was used in close-quarters fighting during the Reconquest of the Sudan 1896-99, were positive.
Field Marshal Montgomery advanced with his 1897 Pattern drawn during a counter offensive in the First World War. The actual sword he carried is exhibited in the Imperial War Museum, London.
The blade is straight and symmetrical in shape about both its longitudinal axes. The thick blade has a deep central fuller on each side and is rounded on both its edge and back towards the hilt, giving a “dumbbell” or “girder” cross section. Through a gradual transition, the blade becomes double edged towards the tip, and the last 17 inches were sharpened when on active service. The blade ends in a sharp spear point.
The guard is a three-quarter basket of pressed, plated steel. It is decorated with a pierced scroll-work pattern and had the royal cypher of the reigning monarch set over the lower knuckle bow.
One of the famous British officer's of WW2, who was a devoted exponent of hand to hand sword combat, using his sword in battle, was infantry officer 'Mad' Jack Churchill. After fighting at Dunkirk, he volunteered for the Commandos. On one occasion, a general who had commented on his weaponry, Churchill is said to have replied "Any officer who goes into action without his sword is improperly dressed."
In his service in Norway (1941)
Churchill was second in command of No. 3 Commando in Operation Archery, a raid on the German garrison at Vågsøy, Norway, on 27 December 1941. As the ramps fell on the first landing craft, he leapt forward from his position playing "March of the Cameron Men" on his bagpipes, before throwing a grenade and charging into battle. For his actions at Dunkirk and Vågsøy, Churchill received the Military Cross.
In Italy;
During the Allied invasion of Sicily
In July 1943, as commanding officer, he led No. 2 Commando from their landing site at Catania, in Sicily, with his trademark Scottish broadsword slung around his waist, a longbow and arrows around his neck and his bagpipes under his arm, which he also did in the landings at Salerno.
Leading 2 Commando, Churchill was ordered to capture a German observation post outside the town of Molina, controlling a pass leading down to the Salerno beachhead. 136–137 With the help of a corporal, he infiltrated the town, captured the post and took 42 prisoners including a mortar squad. Churchill led the men and prisoners back down the pass, with the wounded being carried on carts pushed by German prisoners. He commented that it was "an image from the Napoleonic Wars". He received the Distinguished Service Order for leading that action at Salerno.
Churchill later walked back to the town to retrieve his sword, which he had lost in hand-to-hand combat with the German regiment. On his way there, he encountered a disoriented American patrol mistakenly walking towards enemy lines. When the NCO in command of the patrol refused to turn around, Churchill told them that he was going his own way and that he would not come back for a "bloody third time" read more
575.00 GBP

An 1897 Pattern Victorian British Empire Imperial Officer's Sword, From the Victorian British Raj Period
Made by Robert Mole of Birmingham, and bears the fully pierced hilt, with royal cypher VRI {Victoria Regina Imperatrix} Victoria, Queen Empress.
Wooden and leather FS scabbard. With original wire bound sharkskin grip.
We just acquired effectively the full set of British Infantry swords used from 1895 onwards. The Victorian 1895 pattern by Wilkinson, a Victorian 1897 pattern by Robert Mole from the British Raj in India, a King George Vth, by Wilkinson, in its WW1 FS scabbard, and a King George Vth 1897 pattern Wilkinson sword in its dress scabbard, from WW1, but also used in WW2 and still perfectly usable today, by an officer in the current service of H.M.King Charles IIIrd
Although a Victorian antique sword, this sword would have seen service use for the following two world wars.
We show two photos in the gallery of a British Raj Colonel with his same sword, and another a portrait of a British Indian Army General holding his same Raj officer's sword.
This is also the form of sword used in the Boxer Rebellion in China by the Imperial Indian Army Regiment's officers of the 24th Punjabis and 1st Sikhs who were in fact the first to reach the Legations during the seige.
The 1897 pattern British Infantry officer's sword has remained unchanged to the present day.
By the time of its introduction, the sword was of limited use on the battlefield against rapid-firing rifles, machine guns and long-range artillery. However, the new sword was regarded, when needed, as a very effective fighting weapon. Reports from the Sudan, where it was used in close-quarters fighting during the Reconquest of the Sudan 1896-99, were positive.
Field Marshal Montgomery advanced with his 1897 Pattern drawn during a counter offensive in the First World War. The actual sword he carried is exhibited in the Imperial War Museum, London.
The blade is described in the pattern as being 32+1/2 inches (830 mm) long and 1 inch (25 mm) wide at the shoulder, with the complete sword weighing between 1 lb 12oz and 1 lb 13 oz (794-822g).
The blade is straight and symmetrical in shape about both its longitudinal axes. The thick blade has a deep central fuller on each side and is rounded on both its edge and back towards the hilt, giving a “dumbbell” or “girder” cross section. Through a gradual transition, the blade becomes double edged towards the tip, and the last 17 inches (430 mm) were sharpened when on active service. The blade ends in a sharp spear point.
The guard is a three-quarter basket of pressed, plated steel. It is decorated with a pierced scroll-work pattern and had the royal cypher of the reigning monarch set over the lower knuckle bow.
The grip, between 5 and 5 ¾ inches long to suit the hand of the owner, was generally covered in ray or sharkskin and wrapped with German-silver wire. The grip is straight, with no offset to the blade.
The sword shows a number of features that indicate its intent as a thrusting weapon. The spear point and double edge towards the point aids penetration and withdrawal by incising the wound edges. The blade, whilst quite narrow, is thick and its dumbbell section gives it good weak-axis buckling strength whilst maintaining robustness in bending for the parry. The blade tapers in both width and thickness and, with the substantial guard, has a hilt-biased balance, aiding agility at the expense of concussive force in a cut.
The leather on the wooden scabbard is excellent, with typical Raj period long scabbard chape. The hilt and blade are both very bright polished, the blade is excellent condition, the hilt has light overall aged surface marking.
This photograph/file of Col Rao Bahadur Balu Singh OBI IDSM is licensed under the Creative Commons Attribution-Share Alike 4.0 International license. Nsshekhawat649 read more
350.00 GBP

A Superb and Very Rare Imperial German Naval Service Issue Straw Hat From SMS Emden One of The Most Famous Warships of WW1, It Sunk or Captured 23 Allied Ships, and 60 Allied Ships Took Part in the ‘Hunt-for-the-Emden’ Before She Was Sunk.
Bearing the wide, imperial black silk straw cap band with the embroidered badge of [SMS] Emden, with a crown over the imperial battle flag, and from family history it was used, during it's service life, on the SMS Emden's barge to transport the Kaiser to his ship before WW1, and by their sailors serving on land based duties in the concessions at Tsingtao, China from 1910. The Emden and her crew has a most significant status within German Naval history for in only three months service it sank or captured 23 ships. It fought with such valiant heroism before it was finally destroyed by the Royal Australian Navy, in November 1914, that all the surviving crew were given the singular and unique honour of having the ship's name, Emden, added as a suffix to their family surname in purpetuity. The SMS Emden was a Dresden class light cruiser launched in 1908 and posted to the East Asia squadron based at Tsingtao in 1910. She took part in the suppression of the Sokehs Rebellion on Ponape in 1910-11 and in 1913 (along with British and Japanese ships) shelled a rebel Chinese fort on the Yangtze.
When the First World War broke out the Emden, under the command of Korvettenkapitan Karl von Muller, set sail from Tsingtao to cause mayhem amongst allied shipping in the Indian Ocean and bombard enemy ports (including Madras in British India). The allies put vast efforts into catching the SMS Emden (at one point having over 60 warships involved in the search) but she eluded them, capturing and sinking thousands of tons of Entente shipping along the way. In November 1914 she was finally cornered off the Cocos Islands and sunk by the Australian light cruiser HMAS Sydney. The surviving crew of the SMS Emden were uniquely honoured for their bravery by being allowed to add the suffix '-Emden' to their surnames. To this day some of their descendants still carry this additional name. She sank eighteen merchantman, converted another to an armed merchant cruiser and captured and used three colliers. She had also raided two allied ports and sank a cruiser and a destroyer as well as causing major disruption to shipping and tying down a large number of enemy warships. Throughout the voyage she had maintained an excellent reputation for "gentlemanly" behaviour, not a single person from the merchant ships she sank was killed, prisoners were well treated and released at the earliest opportunity, enemy wounded were treated as best they could and neutral ships were treated as such.SMS Emden ("His Majesty's Ship Emden") was the second and final member of the Dresden class of light cruisers built for the Imperial German Navy (Kaiserliche Marine). Named for the town of Emden, she was laid down at the Kaiserliche Werft (Imperial Dockyard) in Danzig in 1906. Her hull was launched in May 1908, and completed in July 1909. She had one sister ship, Dresden. Like the preceding Konigsberg-class cruisers, Emden was armed with ten 10.5 cm (4.1 in) guns and two torpedo tubes.
Emden spent the majority of her career overseas in the German East Asia Squadron, based in Tsingtao, in the Kiautschou Bay concession in China. In 1913, she came under the command of Karl von Muller, who would captain the ship during World War I. At the outbreak of hostilities, Emden captured a Russian steamer and converted her into the commerce raider Cormoran. Emden rejoined the East Asia Squadron, after which she was detached for independent raiding in the Indian Ocean. The cruiser spent nearly two months operating in the region, and captured nearly two dozen ships. In late October 1914, Emden launched a surprise attack on Penang; in the resulting Battle of Penang, she sank the Russian cruiser Zhemchug and the French destroyer Mousquet.Muller then took Emden to raid the Cocos Islands, where he landed a contingent of sailors to destroy British facilities.
Emden then set of to raid the important wireless/cable station at the Cocos Islands, arriving at 0600 on November 9. A forty man landing party was put ashore unopposed and the Buresk was signalled to join Emden. Buresk did not reply but the the island started to transmit "S.O.S. Emden is here" both by wireless and cable. Only fifty miles to the north east the was the Anzac convoy which intercepted the transmission. HMAS Sydney (Captain Glossop) was detached from the convoy. Sydney was a modern light cruiser, her 6 inch main guns outgunning the 4.1 inch armed Emden. She left the convoy at 0700 and by exceeding her designed speed arrived at the Cocos after 0900.
At first Emden's lookouts thought Sydney was Buresk but when she was identified as a cruiser the landing party was recalled but were too slow and so at 0930 Emden pulled out of the lagoon without them.
Ten minutes alter Emden opened fire with her starboard guns at 10,000 yards, hitting with her third salvo, knocking out Sydney's range finder. Emden continued to score hits, knocking out a gun and starting a fire but by 1000 Sydney had found Emden's range. By 1020 Emden had lost her wireless station, a forward gun, her electrics and steering. She then received damage to her shell hoists and her firing became ragged. Sydney was a faster ship than Emden and throughout the action maintained a range best suited to her heavier guns. Emden's forward funnel fell across deck causing her to be shrouded in smoke and to reduce speed below twenty knots. For the next half an hour Emden was hit repeatedly, over 100 times during the entire action, and Captain Muller decided to beach her before she sank. At 1115 she was beached, Sydney ceasing fire five minutes later and setting off after Buresk which had just arrived. Buresk scuttled herself to prevent capture and Sydney returned to the Emden. She signalled Emden to ask for surrender but received no reply and as Emden was still flying her battle flag she opened fire again. Emden hauled down her battle flag and raised a white flag, ending the battle.
Sydney dropped off medical supplies then headed back to the main island to capture the landing party but when she arrived they had left in the commandeered schooner Ayesha. They eventually made it to Turkey in May 1915.
Emden lost 131 killed and sixty five wounded whilst Sydney suffered three killed and eight wounded. Karl von Muller was the last to leave Emden and spent the remainder of the war as a P.O.W.. Over a raiding career spanning three months and 30,000 nautical miles, Emden had destroyed two Entente warships and sank or captured sixteen British steamers and one Russian merchant ship, totaling 70,825 gross register tons. Another four British ships were captured and released. Another very rare surviving Imperial German Navy straw hat, from the Kaisers Yacht [the SMY Hohenzollern] but with it's Kaisersciffe title SMS Hohenzollern, we show it in our photograph gallery just as it is now exhibited in the The International Maritime Museum Collection, Hamburg read more
995.00 GBP