Antique Arms & Militaria


A Former Helmet Created From a Helmet in the Royal Collection. A Victorian, Italian Morion Helmet, Probably From Milan, Circa 1544. Likely Created by Instruction From The Curators Of the Royal Collection In Around 1873
This is likely a unique copy made in the 19th century directly from a fabulous helmet in the Royal Collection, in the Round Tower at Windsor Castle, and believed to be from the personal collection of King George IIIrd. Naturally as the original would never become available this is a unique opportunity to own a simulacrum from Her Majesty’s armoury. This stunning helmet was made in the 19th century using the incredibly advanced copper electrotype system with fully faithful and exact detail from the royal helmet. A system so exact in its ability to recreate an identical version of the original, it was considered by some to be a magical marvel. It has a slightly misshapen damage at the comb. The plume holder etched with a religious scene (possibly the Trinity) and the inscription LAVDAMVS TE (We praise Thee) . In the Round Tower at Windsor Castle in 1904. The collection of George III included ‘A Helmet English, Very Ancient Made of Iron – Embossed with Scrolls – Stars and Leaves had formerly been Gilt’, which was sent to the armoury from Buckingham House on 20 September 1821.
Item no. 2048 in the North Corridor Inventory, which records the arrangement of the Collection at Windsor Castle. We believe it was most likely made by instruction from the curators of the Royal Collection, that commissioned a identical copy made, possibly for the national museum collection, such as the amazing plaster copies of unique worldwide masterpieces in the V&A. Opened in 1873, the Cast Courts display copies of some of the world's most significant works of art reproduced in plaster, electrotype, photography, and digital media. The cast collection is famous for including reproductions of Michelangelo's David, Trajan's Column, and Ghiberti's Gates of Paradise, amongst many others. Electrotyping was an incredible chemical method for forming metal parts that exactly reproduce a model. The method was invented by Moritz von Jacobi in Russia in 1838, and was immediately adopted for applications in printing and several other fields. As described in a treatise, electrotyping produces "an exact facsimile of any object having an irregular surface, whether it be an engraved steel- or copper-plate, a wood-cut, or a form of set-up type, to be used for printing; or a medal, medallion, statue, bust, or even a natural object, for art purposes." In art, several important "bronze" sculptures created in the 19th century are actually electrotyped copper, and not bronze at all One of the earliest documented large-scale (1.67 metres (5.5 ft)) electrotype sculptures was John Evan Thomas's Death of Tewdric Mawr, King of Gwent (1849). The electrotype was done by Elkington, Mason, & Co. for the Great Exhibition of 1851. Link to see the original example http://www.royalcollection.org.uk. The gallery shows a photo of the original Italian morion still in the Royal Collection, but made in iron, however, it was originally fully gilded, which this copy still appears to be, likely in order to show how it once looked when it was originally made in around 1544 in Italy. It is not often any collector has the opportunity to purchase an absolute identical version of a piece of armour in the Royal Collection that was actually made from the Royal original. If the original were to ever come on the open market which it never will of course it would likely be worth six figures or even seven figures 1 million pounds plus due to its Royal connection.
Probably the most famous electrotype simulacrum seen today is the Wimbledon Women’s final trophy. See photo 8 in our gallery.
Tennis fame
The version held aloft as the Wimbledon Ladies Singles Championship trophy was made in silver by the firm of Elkington and Company of Birmingham in 1864. This version is known as the Venus Rosewater Basin, and was first presented at Wimbledon in 1886. Every champion since has had her name engraved on it. The reproduction of the basin was made by the electrical deposition of silver into a mould, and used the plaster cast of an Enderlein basin in the Louvre as a model. When it was first created, the Wimbledon reproduction represented the height of 19th century modernity and was at the forefront of technological innovation. The V&A has an electrotype version which was also made by Elkington, and was moulded from the same plaster cast, 12 years before the creation of the Wimbledon trophy. read more
1995.00 GBP
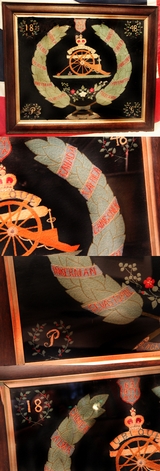
A Most Fine, Antique, Original Regimental Embroidery Of the Royal Artillery, P Battery, 63rd Royal Field Artillery, With Crimean War, Canada and Boer War Battle Honours. One Of The Best Examples We Have Seen in 50 Years
Stunningly handsome embroidered regimental wreathed crest, with the field cannon and motto ‘Ubique’ of legendary ‘P’ Battery, and also bearing their later title the 63rd RFA. Royal Field Artillery
Likely stiched by an officer's lady from the regiment. A traditional pastime of the wives of the serving or past serving men from British Regiments in the army, or, by sailors themselves in the Royal Navy was the making of highly intricate embroidery of their regimental colours.
From the doomed attempt to seize the Russian guns by the Light Brigade at Balaclava, to the Siege of Sebastopol itself, artillery played a major part in the Crimean War. The official history of the Royal Artillery Regiment in the conflict is therefore indispensible to a full picture of the war. Original embroidery , made in the Victorian to WW1 period, nicely framed. With Crimean War, Canada and Boer War Battle Honours. The story of the 63rd RFA from 1899; The 63rd lost their guns on the Ismore. They were refitted and joined Buller in Natal in time to take part in the operations about Spion Kop and Vaal Krantz and in the final relief actions. One officer was mentioned in General Buller's despatch of 30th March 1900. The battery accompanied that general in his northward movement to the south of the Transvaal, and a section went with General Clery to Heidelberg. In General Buller's final despatch 2 officers were mentioned. Towards the close of 1900 and in 1901 the battery was employed about the Standerton line, and four guns accompanied the column of Colonel Colville which operated on that line and in the north-east of the Orange River Colony. Referring to an action near Vlakfontein, Lord Kitchener in his telegram of 22nd December 1900 said, "Colonel Colville attributes the small loss to the excellent shooting of the 63rd Battery and the skilful leading of Lieutenant Jarvis, 13th Hussars, and Captain Talbot and Lieutenant White of the Rifle Brigade". 34.5 inches x 29 inches in the frame. read more
650.00 GBP
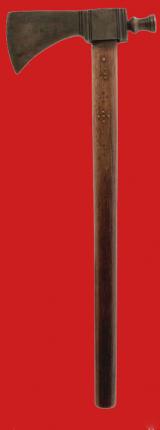
A Superbly Attractive Native American Trade Style Tomahawk Axe, Typical Import Pattern With Trader’s Inventory Stamp. Reservation Period
With studded wooden haft, the axe with single curved blade and rounded opposing pole hammer. Probably 19th century or later. The metal trade tomahawk has long been an object of fascination for both the amateur collector and the ethnologist. Few other implements have ever combined so many different
functions: tool, weapon, sceptre, symbol and smoking pipe. In this one instrument is collected the lore of handicraft, warfare, prestige, ceremony and personal comfort. Captain John Smith is beheved to have been the first to bring the word into English in his brief vocabulary of Indian terms prepared sometime during the years 1607-1609, when he defined tomahaks simply as meaning "axes." Later he added that the term was applied to both the native war club and the imported iron trade hatchet. Almost from the moment the Native American Indian first saw the metal hatchet or tomahawk, likely made in Sheffield, England, he coveted it, and sought to possess one for himself. The efficiency of the new implement was readily apparent : it was deadlier in combat, more efficient in cutting wood, and just as useful as a ceremonial object. Although it was an excellent weapon, the new American man was not as reluctant to trade it as he was to dispense guns. The axe was also self-sufficient; it could function without such components as powder and ball that had to be obtained from the traders. Thus the hatchet could and did spread rapidly through Indian trade routes far from the points of frontiersman’s contact, reaching tribes and areas as yet unknown to the few Europeans along the coast. The first contact of the Indian with the iron or steel axe undoubtedly occurred with the arrival of the Vikings, and to judge from accounts in the sagas, the meetings were not auspicious. Two instances are recounted which may well be the first recorded encounters of the Indian with the weapon which later was to become almost synonymous with his warfare. The Saga of Eric the Red recalls the first reported battle of the Vikings with the natives of America
“The Skrellings Indians, moreover, found a dead man, and an axe lay beside him. One of their number picked up the axe and struck at a tree with it, and one after another they tested it and it seemed to them to be a treasure, and to cut well; then one of their number seized it, and hewed at a stone with it so that the axe broke, whereat they concluded that it could be of no use, since it would not withstand stone, and they cast it away.”
But not all Indians thought the same.
The potentialities of the axe as a weapon were apparent to the Indian from the outset. Garcilaso de la Vega tells of a bloody fight between an Indian armed with a captured battle axe and several of De Soto's soldiers, in which he even includes a i6th century version of the old story of a man being cut in two so quickly by a keen blade that he remains standing and has time to pronounce a benediction before falling. In Florida, Jacques LeMoyne illustrated the murder of a colonist by an Indian with an axe during the brief French settlement at Fort Caroline, 1564-1565. By the early 17 th century the tomahawk was firmly established in the minds of the white settlers as the Indians' primary weapon, and was much more feared than the bow and arrow. Even after the Indians had obtained a sizeable number of firearms, the tomahawk retained its popularity and importance. Once a gun had been fired, it was useless until it could be reloaded ; an edged weapon was needed as a supplement, and this was the tomahawk. Moreover, for surprise attacks and raids, a firearm was frequently out of the question. This axe’s trade stamp could be a weight mark, or even a quantity mark. Lists of trade goods and treaty gifts indicate that the axe, hatchet, or tomahawk were among the most desired objects. As many as a quantity of 300 axes might be handed out at one treaty meeting, and Sir Wilham Johnson estimated that the Northern Indian Department needed 10,000 axes for trade purposes in the year 1765 alone. This is a 19th century trade axe.
Head 7.5 inches, x 3.25 inches length 20.5 inches. We cannot ship this item to the US. read more
975.00 GBP
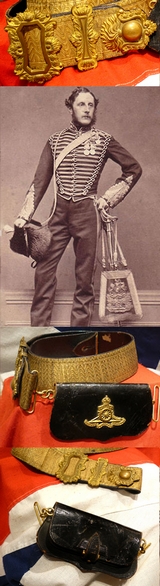
An Original, Antique, Edwardian Royal Artillery Undress Pouch and Bullion Dress Cross Belt
Gold bullion crossbelt with gilt bronze fitting of traditional finest quality. A leather undress pouch with gilt brass swivel mounts. Reverse of leather pouch with old score marks. The undress pouch is in patent leather with gilt Royal Artillery badge and motto. The belt has superb original bullion with gilt bronze mounts, embellished finely cast acanthus leaves and the flaming canon ball. The design of the full dress pouch followed that of the full dress sabretache in that the royal arms were central over the battle honour, UBIQUE, latin for 'everywhere'. Laurel leaves are on the left and oak leaves on the right. Below UBIQUE is a metal gun badge, and below that is a three part scroll with the regimental motto QUO FAS ET GLORIA DUCUNT - Where Right and Glory Lead. This pouch was worn for special occasions. Mostly the full dress pouch belt was worn with the undress black leather pouch. A vintage photo in the gallery show a Royal Artillery officer wearing his cross belt and pouches however, the pouches are worn across the back and not visible from the front in this photo read more
595.00 GBP
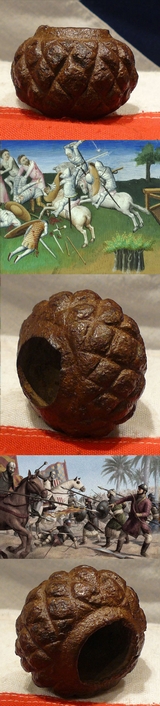
An Original Ancient Medieval 13th Century, Knight's, Iron Battle Mace & Scorpion Flail MaceHead
A pineapple shaped iron head, with large centre mounting hole, for a leaded chain or a haft. The wooden haft as usual has rotted away, but could be replaced one day for display purposes. This is the type of War Mace that were also used as a Flail Mace, with the centre mount being filled with lead and a foot to a foot and a half long chain mounted within in, and then it was attached to a wooden haft, so it could be flailed around the head. Flattened pyramidical protuberances, most possibly English. Made for a mounted Knight to use as an Armour and Helmet Crusher in mortal combat. It would have been continually used up to the 15th to even 16th century. On a Flail it had the name of a Scorpion in England or France, or sometimes a Battle-Whip. It was also wryly known as a 'Holy Water Sprinkler'. King John The Ist of Bohemia used exactly such a weapon at the Battle of Crecy, for as he was blind, and the act of 'Flailing the Mace' meant that his lack of site was no huge disadvantage in close combat. Although blind he was a valiant and the bravest of the Warrior Kings, who perished at the Battle of Crecy against the English in 1346. On the day he was slain he instructed his Knights both friends and companions to lead him to the very centre of battle, so he may strike at least one blow against his enemies. His Knights tied their horses to his, so the King would not be separated from them in the press, and they rode together into the thick of battle, where King John managed to strike not one but at least four noble blows. The following day of the battle, the horses and the fallen knights were found all about the body of their most noble King, all still tied to his steed. It was his personal banner of the triple feathers that was adopted following this battle by the Prince of Wales as his standard, and still used by Prince William the current Prince of Wales today.
During the Middle Ages metal armour such as mail protected against the blows of edged weapons. Solid metal maces and war hammers proved able to inflict damage on well armoured knights, as the force of a blow from a mace is great enough to cause damage without penetrating the armour. Though iron became increasingly common, copper and bronze were also used, especially in iron-deficient areas.
It is popularly believed that maces were employed by the clergy in warfare to avoid shedding blood (sine effusione sanguinis). The evidence for this is sparse and appears to derive almost entirely from the depiction of Bishop Odo of Bayeux wielding a club-like mace at the Battle of Hastings in the Bayeux Tapestry, the idea being that he did so to avoid either shedding blood or bearing the arms of war. One of the Crusades this type of mace may have been used was the Crusade of 1239, which was in territorial terms the most successful crusade since the First. Called by Pope Gregory IX, the Barons' Crusade broadly spanned from 1234-1241 and embodied the highest point of papal endeavour "to make crusading a universal Christian undertaking." Gregory called for a crusade in France, England, and Hungary with different degrees of success. Although the crusaders did not achieve any glorious military victories, they used diplomacy to successfully play the two warring factions of the Muslim Ayyubid dynasty (As-Salih Ismail in Damascus and As-Salih Ayyub in Egypt) against one another for even more concessions than Frederick II gained during the more well-known Sixth Crusade. For a few years, the Barons' Crusade returned the Kingdom of Jerusalem to its largest size since 1187.
This crusade to the Holy Land is sometimes discussed as two separate crusades: that of King Theobald I of Navarre, which began in 1239; and, the separate host of crusaders under the leadership of Richard of Cornwall, which arrived after Theobald departed in 1240. Additionally, the Barons' Crusade is often described in tandem with Baldwin of Courtenay's concurrent trip to Constantinople and capture of Tzurulum with a separate, smaller force of crusaders. This is because Gregory IX briefly attempted to redirect the target his new crusade from liberating the Holy Land from Muslims to protecting the Latin Empire of Constantinople from heretical Christians. read more
985.00 GBP

A Fabulous & Massive Antique Moro Keris Kalis, A Phillipines Pre Colonial Style Warrior's Sword
A kalis ( in Jawi script: كاليس ) is a type of Philippine sword. The kalis has a double-edged blade, which is commonly straight from the tip but can be wavy near the handle. Kalis exists in several variants, either with a fully straight or fully wavy blade. It is similar to the Javanese keris, but differs in that the kalis is a sword, not a dagger. It is much larger than the keris and has a straight or slightly curved hilt, making it a primarily heavy slashing weapon (in contrast to the stabbing pistol grip of the keris).
Blade length (incl. gangya): 58.5 cm (23 in.)
Width of blade (mid-point): 4 cm
Hilt length: 10.2 cm
OAL: 71 cm (27 7/8 in.)
Width of gangya {guard} tip to tip: 13.2 cm
This blade is of laminated construction. The ricikin shows a secah kasang (elephant trunk), gandhik, praen (tusk), and lambe gajah (elephant lips). The orientation of these features is similar to the much later forms of Indonesian Keris, although the lambe gajah straddle the line of separation between the gandhik and the gangya, instead of appearing low on the gandhik. There is no sogokan or blumbanggan. Greneng and jenggot are present, and both show wear. There is a single, one-piece, asang asang. The hilt is a single piece of carved banati wood, topped with cushion shaped pommel. The grip is bound with criss-crossing rattan, which also secures the extension of the asang asang. The scabbard is made of local wood and bound with plaited rattan strips. Its durability and sharpness can be comparable to the Japanese katana.
A collection of Moro keris types are archived in the United States National Museum.
Even before the arrival of Spain, the knowledge of metallurgy in the pre-colonial Philippines was neither tribal nor primitive. In fact, it was already sophisticated. Because if it was not, Panday Pira would not have come to be. The blades of these swords are a testament to the expertise of these early Filipinos.
The history of the Philippines from 1565 to 1898 is known as the Spanish colonial period, during which the Philippine Islands were ruled as the Captaincy General of the Philippines within the Spanish East Indies, initially under the Viceroyalty of New Spain, based in Mexico City, until the independence of the Mexican Empire from Spain in 1821. This resulted in direct Spanish control during a period of governmental instability there.
The first documented European contact with the Philippines was made in 1521 by Ferdinand Magellan in his circumnavigation expedition,1 during which he was killed in the Battle of Mactan. Forty-four years later, a Spanish expedition led by Miguel López de Legazpi left modern Mexico and began the Spanish conquest of the Philippines in the late 16th century. Legazpi's expedition arrived in the Philippines in 1565, a year after an earnest intent to colonize the country, which was during the reign of Philip II of Spain, whose name has remained attached to the country.
The Spanish colonial period ended with the defeat of Spain by the United States in the Spanish–American War and the Treaty of Paris on December 10, 1898, which marked the beginning of the American colonial era of Philippine history.
The scabbard throat have small side elements lacking read more
650.00 GBP

A Rare, Archaic Chinese Warrior's Bronze & Tinned Jian Sword, Around 2,300 to 2,800 Years Old, From the Zhou Dynasty to the Qin Dynasty, Including the Period of the Great Military Doctrine 'The Art of War' by General Sun-Tzu
Chinese Bronze 'Two Ring' wide bladed double edged Jian sword, of tin rich over bronze alloy construction used in the era of the Seven Kingdoms period, likely in the Kingdom of Wu, up to the latter part of the Eastern Zhou dynasty (475 – 221 BC). The surface amazingly still retains a lot of the fine tinned surface. Tinning was used in China from the Eastern Zhou period (770–221 BC), and various methods were employed. A special technique was amalgam tinning, documented since the seventh century BC .
This is one of a stunning collection of original archaic bronze age weaponry we have acquired and we have been cataloguing. Many are near identical to other similar examples held in the Metropolitan in New York, the British royal collection, and such as the Hunan Provincial Museum, Hunan, China. Many pieces we acquired were sold for the part benefit of the Westminster Abbey fund, and the Metropolitan Museum fund. From the Tony Dove F.S.A. Collection, formed circa 1970's, one of England’s most revered and respected collectors, especially early silver, & he was a past honorary President of London’s Silver Spoon Society, and learned joint contributor to many scientific appraisals on ancient Chinese swords
Sword total length 20 1/4 inches long, 4 inch hilt
Swords of this type are called “two-ring” swords because of the prominent rings located on the hilt. this is the very type of sword used by the warriors serving under the world renowned General Sun Tzu, in the Kingdom of Wu, who is thought by many to be the finest general, philosopher and military tactician who ever lived. His 2500 year old book on the methods of warfare, tactics and psychology are still taught and highly revered in practically every officer training college throughout the world.
We show a painting in the gallery of a chariot charge by a Zhou dynasty warrior armed with this very form of sword. We also show a photograph of warriors the world renown Chinese Tomb Army, discovered and excavated over the past recent decades. The figures apparently show the real image of the faces of each individual warrior of the first emperor of China, Qin Shi Huang, that each statue represents. Each one is adorned the typical combat armour that would have been worn by the past user of this sword, and used a same time as the Tomb Warriors were being created and buried for the tomb of Emperor Qin. China was the name created for the entire country, after their first emperor, although spelt Qin in the English form it is pronounced Chin, hence, China. The Qin emperors last resting place, the tomb and his buried imperial warrior army, covers a breathtaking 56.25 square kilometres, and may take the best part of another 100 years to excavate. By this measure one can see with respect and awe the size and power of ancient China, and this tomb region was created over 2300 years ago. Compare this to the only remaining example of the past recorded, and so called, Seven Wonders of the World, the great pyramid of Giza, it covers just one quarter of a square kilometre, yet it is still considered one of the largest single buildings ever created by man.
The Chinese term for this form of weapon is “Jian” which refers to a double-edged sword. This style of Jian is generally attributed to either the Wu or the Yue state. The sword has straight graduated edges reducing to a pointed tip, which may indicate an earlier period Jian.
The blade is heavy with a midrib and tapered edges from the hilt.
A very impressive original ancient Chinese sword with a long, straight blade with a raised, linear ridge down its centre. It has a shallow, short guard. The thin handle would have had leather or some other organic material such as leather or hemp cord, wrapped around it to form a grip. At the top is a broad, round pommel.
Although the manufacturing techniques used may have varied from region to region, it is generally believed that such tin-rich decoration was achieved by a deliberate tinning process,including cold-tinning hot-tinning (dipping or wiping) the use of a mercury-tin amalgam ,or the application of a tin-rich paste.
In 1965 a similar form sword from the same era was found in an ancient tomb in Hubei, it was also engraved with seal script, but of a different form. The Sword of Goujian (越王勾践剑) is a tin bronze sword, renowned for its unusual sharpness, intricate design and resistance to tarnish rarely seen in artifacts of similar age. The sword is generally attributed to Goujian, one of the last kings of Yue during the Spring and Autumn period.
On one side of the Hubei sword’s blade, two columns of text are visible. Eight characters are written in an ancient script, now known as Bird-worm seal script (literally "birds and worms characters", owing to the intricate decorations of the defining strokes), a variant of seal script. Initial analysis of the text deciphered six of the characters, "King of Yue" (越王) and "made this sword for his personal use" (自作用劍). The remaining two characters were assumed to be the name of the particular King of Yue.
The Seven Kingdom or Warring States period in Chinese history was one of instability and conflict between many smaller Kingdom-states. The period officially ended when China was unified under the first Emperor of China, Qin pronounced Chin Shi Huang Di in 221 BC. It is from him that China gained its name.
The Zhou Dynasty (1046-256 BCE) was among the most culturally significant of the early Chinese dynasties and the longest lasting of any in China's history, divided into two periods: Western Zhou (1046-771 BCE) and Eastern Zhou (771-256 BCE). It followed the Shang Dynasty (c. 1600-1046 BCE), and preceded the Qin Dynasty (221-206 BCE, pronounced “chin”) which gave China its name.
In the early years of the Spring and Autumn Period, (770-476 BC) chivalry in battle was still observed and all seven states used the same tactics resulting in a series of stalemates since, whenever one engaged with another in battle, neither could gain an advantage. In time, this repetition of seemingly endless, and completely futile, warfare became simply the way of life for the people of China during the era now referred to as the Warring States Period. The famous work The Art of War by Sun-Tzu (l. c. 500 BCE) was written during this time, recording precepts and tactics one could use to gain advantage over an opponent, win the war, and establish peace.
Sun Tzu was a Chinese general, military strategist, writer, and philosopher who lived in the Eastern Zhou period of ancient China. Sun Tzu is traditionally credited as the author of The Art of War, an influential work of military strategy that has affected both Western and East Asian philosophy and military thinking. His works focus much more on alternatives to battle, such as stratagem, delay, the use of spies and alternatives to war itself, the making and keeping of alliances, the uses of deceit, and a willingness to submit, at least temporarily, to more powerful foes. Sun Tzu is revered in Chinese and East Asian culture as a legendary historical and military figure. His birth name was Sun Wu and he was known outside of his family by his courtesy name Changqing The name Sun Tzu by which he is more popularly known is an honorific which means "Master Sun".
Sun Tzu's historicity is uncertain. The Han dynasty historian Sima Qian and other traditional Chinese historians placed him as a minister to King Helü of Wu and dated his lifetime to 544–496 BC. Modern scholars accepting his historicity place the extant text of The Art of War in the later Warring States period based on its style of composition and its descriptions of warfare. Traditional accounts state that the general's descendant Sun Bin wrote a treatise on military tactics, also titled The Art of War. Since Sun Wu and Sun Bin were referred to as Sun Tzu in classical Chinese texts, some historians believed them identical, prior to the rediscovery of Sun Bin's treatise in 1972.
Sun Tzu's work has been praised and employed in East Asian warfare since its composition. During the twentieth century, The Art of War grew in popularity and saw practical use in Western society as well. It continues to influence many competitive endeavours in the world, including culture, politics, business and sports.
The ancient Chinese people worshipped the bronze and iron swords, where they reached a point of magic and myth, regarding the swords as “ancient holy items”. Because they were easy to carry, elegant to wear and quick to use, bronze swords were considered a status symbol and an honour for kings, emperors, scholars, chivalrous experts, merchants, as well as common people during ancient dynasties. For example, Confucius claimed himself to be a knight, not a scholar, and carried a sword when he went out. The most famous ancient bronze sword is called the “Sword of Gou Jian”.
The Warring States period saw a transition in military styles, from bronze weaponry and chariot-based fighting to iron and cavalry. However, the old period was still revered. Despite the cost of manufacturing bronze swords like this on a mass scale, this particular style of duan jian – a double-edged straight sword – was used in China for approximately 2,500 years. Finely made bronze weapons such as this one were signs of prestige, wealth, and fighting prowess used in both ceremonial and funerary contexts. For example, swords were worn by the Emperor and his officials in ceremonial or official dress, attached to the belt with jade ornaments.
This is one of a stunning collection of original archaic bronze age Zhou dynasty weaponry we have just acquired. Many are near identical to other similar examples held in the Metropolitan in New York, the British royal collection, and such as the Hunan Provincial Museum, Hunan, China. As with all our items, every piece is accompanied by a certificate of authenticity. 22 inches long overall.
Ref; SOME OBSERVATIONS ON EARLY CHINESE BRONZE SWORDS
By
Anthony Dove and Alan Williams {The Wallace Collection} 65 publications read more
2795.00 GBP

18th Century Royal Naval 100 Gunner Ship-Of-The-Line, Gunner's Cannon Priming Flask, Made and Used from the American Revolution, the Battle of Trafalgar and Beyond. Bearing a Royal Naval Ordnance Crown Stamp
King George IIIrd period. Used in the Royal Navy from the 1770's onwards. This is from a wonderful very small collection of fine, early, British Royal Naval pieces that we acquired. A traditional and most rare King George IIIrd period, 18th century gunner's flask, used on board a warship for likely 50 years or more, into the early 19th century of the Admiral Nelson period, and through the Napoleonic Wars.
A Royal Naval gunner's priming powder flask, of polished cow horn body, with traditional turned wooden base with screw threaded removable handle, with Royal Naval Ordnance Crown Stamp {see photo 10}, turned brass and spring actioned pouring spout, and two iron carrying rings.
A near identical example is in Oxford University's Pitt Rivers Museum that came from a gunner serving on HMS Victory at Trafalgar see photo in the gallery In the firing naval cannon at Trafalgar, huge amounts of gunpowder were required to fire them, and the cannon were ignited with very fine quality, fine ground priming powder poured into the touch hole. Young boys, often known as powder monkeys, would haul gunpowder to the gun decks within barrels. Cow horns flasks, with brass spring actioned spouts, just such as this one, were used to contain the fine grain priming powder, which was poured into the pan of the touch hole of each cannon before firing. The example that can be seen photographed in our gallery was donated to the Pitt Rivers Museum in Oxford by the Wellcome Historical Medical Museum (now Wellcome Institute) in 1952, it is said to have belonged to a gunner on Admiral Nelson's flagship, HMS Victory.
The Victory famously led a fleet of twenty-seven British ships to victory over Napoleon's forces at the Battle of Trafalgar in October 1805, although Nelson himself sustained a mortal injury aboard deck. Because the vast majority of an 18th century ship's armament was mounted in its broadside, fleets typically formed into a single line ahead in preparation for battle. This simplified command and control each ship could simply follow the ship in front and enabled the fleet to uniformly arrange its firepower along a continuous formation with no weak spots. The line was sometimes divided into van (forward), centre, and rear divisions under subordinate commanders. Maintenance of a continuous, unbroken line was important. If the enemy was able to position directly ahead or behind a friendly ship, he would be comparatively safe from attack (as only a handful of guns fired directly ahead or astern) and could concentrate his broadside against the weakest parts of his target the lightly constructed bow and stern. For this reason, fleet battles often resolved into two parallel lines of ships edging towards each other with each ship indecisively facing its opposite. More aggressive admirals sought ways to overcome this tactical stalemate, concentrating their force against a smaller portion of the enemy by breaking the line.
Firing began once the fleets closed within range. At the extreme, cannon shot might reach the enemy at ranges up to a mile, but British commanders often held their fire until the ships had closed to only a few hundred yards, or even less. The adversaries would then pour fire into one another, shattering hulls, masts, rigging, and men with heavy cannon shot. Individual ships might surrender by hauling down (striking) their colours when disabled by damage or casualties. As a last resort, a ship might be forced to surrender through boarding. Battle usually continued until one side disengaged or the sun set though a number of battles were fought partly or entirely in the dark.
Priming powder was a refined type of gunpowder that ignited more easily and so it was important to use the right amount. Too much powder could be catastrophic, too little powder might prevent ignition of the main charge in the breech, resulting in just a flash in the pan. Here, a brass mounted spring catch helped control the amount that was poured out. Two screw hooks can be seen where the horn would have been attached to a belt or baldrick and slung around the gunner?s torso, and it could be refilled by unscrewing the wooden stopper at the broad end.
Horn was an ideal material for powder flasks as it was readily available and provided a natural container; unlike metal it was not liable to create sparks that might accidentally ignite the powder inside; and it was also translucent when held up to the light, so it was possible to see how much powder was left.
See photos 8 and 9 in the gallery that shows the identical gunner's priiming flask on board HMS Victory, as part of the museum's display
This flask is just under 11 inches long. read more
1625.00 GBP

A Very Rare Antiquity of Ancient Roman Empire. The 1st Roman Legion, Late 1st century AD, Rectangular Building Block With Stamped Text 'LEG I ITAL' for 1st Legion 'Italica';
A notable and substantial piece formerly from the renown Scammell Collection of ancient artifacts. Its original mortar is still attached to the reverse. LEG I ITAL was the first legion raised by Emperor Nero in September 66 AD. In 181 AD, Marcus Valerius Maximianus, an important Roman general, was the general of the 1st Legion Italica, and he was a confident of Emperor Marcus Aurelias, during the period of the Marcomannic Wars. It is said he inspired the composite fictional general Maximus Decimus Meridius, the main character and Roman General in Gladiator played by Russell Crowe, and it was the Marcomannic wars that are depicted in the earliest scenes in Gladiator in which the fictional Marcus Valerius Maximis was a commanding general. Marcus Valerius Maximianus was placed in charge of detachments of the praetorian fleets of Misenum and Ravenna and also of African and Moorish cavalry used for scouting duties in Pannonia. While on active service with the cavalry Maximianus killed a Germanic chieftain named as "Valao, chief of the Naristi" with his own hand and was publicly praised by the Emperor, who granted him the chieftain's "horse, decorations and weapons". He was appointed prefect of the lance-bearing cavalry and was in charge of the cavalry. The Ist Legion was still based on the Danube in the 5th century. We show a Roman marble bust of Emperor Marcus Aurelius who was played by Richard Harris in Gladiator. The main fighting unit of the Roman army was the legion. During the first three centuries of the empire the army contained between 25 and 34 legions. Each legion was made up of about 5000 men recruited from the citizens. Although the soldiers of the legion were Roman citizens, they were drawn from all walks of life and legions often consisted of natives from conquered countries.
The legion contained within its ranks troops trained and equipped to perform many duties in wartime and peace. Although the vast majority of soldiers served as heavy infantry, other legionaries fought as cavalry, archers or light infantry. Other troops operated artillery such as the ballista, onagar and scorpio The troops were however not solely prepared for combat. Legionaries regularly served as engineers constructing fortifications, roads and bridges. As the legion counted among its complement a vast number of men with special skills, it was in many ways self-supporting. A large part of its military equipment could be produced by craftsmen drawn from the ranks. Soldiers trained as surveyors, engineers and architects ensured that the legion needed little outside help for its building requirements. As far as a Legion travelled it built buildings, bridges, even sewer systems. And their efforts were stamped upon some of their building bricks to show which legion had constructed them. There are some parts of London that still bear bricks stamped by their engineers of the Roman Legions. Bricks, blocks and tiles stamped P.P.BR.LON or some variant of this has been found associated with the traces of the old Roman palace off Cannon St. Whatever the meaning of the first P, it is clear that the P.BR.LON or PR.BR., as it sometimes appears, is an abbreviation for PROVINCIAE BRITANNIAE LONDINII. At the site of a Roman bath house in Jerusalem, three of the bricks recovered bore the same style of rectangular stamped impression of the Roman Legio X Fretensis – stamped thus LE X FR. Legio X Fretensis ("Tenth legion of the Strait") was a legion of the Imperial Roman army. It was founded by the young Gaius Octavius (later to become Augustus Caesar) in 41/40 BC to fight during the period of civil war that started the dissolution of the Roman Republic. X Fretensis is then recorded to have existed at least until the 410s. This Roman block is from the private collection of Antony John Scammell (1937-2019); acquired on the UK art market from 1960. Antony John Scammell (1937-2019) was born, and lived his entire life, in the city of Bristol, England. Already from an early age he was enthralled by history and the heroes that it created. While serving overseas with the British Army, Antony began collecting coins and banknotes and this led to collecting a variety of different items throughout his life. From the early 1960s onward, Antony invested in acquiring ancient artefacts. Antony's vast collections started with Egyptian antiquities, but soon branched into Greek and Roman civilisations. The Roman civilisation fascinated him most and, when family commitments allowed, archaeological digs were coordinated in the west of England. These digs uncovered numerous artefacts, many of which were donated to local museums. In retirement, the collecting continued apace, branching into UK coins, British Empire banknotes and fossils. It weighs 4.6 kg, and is 19 x 19cm (7 1/2 x 7 1/2"). read more
1450.00 GBP

A Most Rare British Army Officer's 1801, Egyptian Campaign, Snake Goddess' Head Light Infantry Officer’s Sword. Used Throughout The Entire Napoleonic Wars Up To The Battle of Waterloo. Likely By An Officer of ‘The Glosters’
Specifically with British Army ‘Nile Club’ officer's connections, where officer members, who fought in the Egypt campaign, wore distinctive swords with zoomorphic hilts depicting animal gods and goddesses. A direct homage to Nelson's presentation zoomorphic hilted sword, dirk and sword versions of Nelson’s zoomorphic sword, as worn by his captains who served under his command, and by the marines and army officers who similarly fought in his Egypt campaign on land over the next three years, that were members of the so-called Egyptian or Nile Club. The wearing of such a sword {or a dirk} would clearly and distinctively set an officer apart as ‘one who served’ in the great hero’s victorious campaign.
Egyptian gods and goddesses, much famed in ancient Egypt, become hugely popular throughout Western artistic culture in the early 19th century.
Europe became beguiled by ancient Egyptian art and architecture in all its forms, and furniture designers and sculptors particularly, eagerly created the ‘Egyptian style’ in the Regency period England, and the Consular and Directoire period in France.
This is a most rare British officer's bespoke sword, commissioned circa 1800, with such a stylish hilt, of a rare, zoomorphic, ancient Egyptian animal god or goddess form, with its snake god head pommel, with engraved snake-scale body creating its back strap, plus, the Egyptian snake goddess Wadjet's form, as engraved hilt langets. This sword is based on the British 1796 pattern light infantry variant sabre, with its deeply curved slashing blade, superbly etched with King George’s royal cyphers. This sword was continually used throughout the Napoleonic Wars, and up to Waterloo in 1815. Very likely by an officer of ‘The Glosters” the 28th Regiment of Foot. No doubt the fact that the Goddess Wadget was the Ancient Egyptian symbol of divine authority and royal power likely had no small influence upon its choice of design.
In 1801 On the morning of March 21 a vastly superior French army, which easily outnumbered the British, attacked near Alexandria. By those times muzzle-loading rifles were in common use and the infantry fought in two ranks - one row kneeling and the rear rank firing over their shoulders.
At one point during the fierce fighting -when it looked as though the Glosters would be surrounded - the rear rank was commanded to "about face". This meant turning and fighting back-to-back against enemy soldiers coming from the rear. After much savage hand-to-hand combat the French were stopped and by mid-morning their entire army was in retreat.
As a reward for their vital contribution to the victory - and in memory of that back-to-back fighting - the Glosters were given the right to wear a badge at the back, as well as the front, of their caps - the famous sphinx Back Badge.
Napoleon's army in Egypt may have been defeated but on the European mainland his forces remained a serious threat. By 1810 both the 28th and 61st were in Spain with the task of clearing French troops from the entire Peninsular.
But it took another four years of difficult fighting - in which the Glosters lost 1,200 men - before the British, under the command of the "Iron" Duke of Wellington, finally expelled them.
In 1814, Napoleon, having escaped from Elba, once more rallied troops to his cause and the European allies - under the command of the Duke - were sent to face him.
In the summer of 1815, Napoleon was finally defeated at Waterloo and exiled to the island of St Helena. The Glosters were in the forefront of the fighting - and were the only regiment specifically mentioned by name in Wellington's famous despatch.
With a beautiful zoomorphic hilt, with its original mercurial gilt finish, of a beautifully chiselled and hand engraved snake's head and body, combined with two snake engraved langets, with its wire bound wooden grip, and deeply curved now russetted blade bearing King George IIIrd's cyphers. Deep sword cuts from close combat action on the blade edge and upon one langet. Combat damage inflicted likely in the Peninsular War up to Waterloo. Nelson's captains at the Nile formed the Egyptian Club often though referred to as the Nile Club to meet and commemorate the battle. Among their first actions were to present a sword to Nelson and commission his portrait. There were also weapons made, based on the one presented to Nelson, for the other members of the Egyptian Club, that had zoomorphic hilts in the form of crocodiles.
At the instigation, it is said, of Lady Hamilton and Captain Hardy, the Marquess of Queensbury laid out a plantation of trees on his estate near Stonehenge in Wiltshire in the formation of the fleets at the Battle of the Nile, known as the ‘Nile Clumps’. A ceremonial sword with its hilt in the shape of a crocodile commemorating Nelson's victory over the French at the Battle of the Nile in 1798, which was estimated at £40,000 to £60,000, sold at auction in 2002 for £270,650 to a private collector.
The engraved sword was one of a handful made for the elite Egyptian Club whose membership was restricted to the captains of ships which had fought at the Nile. Nelson called them his "band of brothers". However, Howard Blackmore late assistant keeper of the Tower of London Collection told us around 30 years ago, that there was a distinct possibility British army officers, that also fought at the Nile Campaign, but of course on land, formed their own version of Nelson's Egyptian Club, called the Nile Club, where officers in the campaign had zoomorphic Egyptian snake or camel hilted swords presented to each other. The snake hilted version were based on the snakes of the ancient Egyptian Goddess Wadjet, and the snake head on the Pharaoh's crown. There is a distinct possibility that this sword may well be one of those, its rare shape and form certainly shows as likely. We have heard of one serving example now in America, a Nile club officer’s sword with a zoomorphic camel head hilt. Its likely possibilities of provenance are most intriguing. Five years ago also we had a British camel headed version likely from the same club member. The French Campaign in Egypt and Syria (1798-1801) was Napoleon Bonaparte's campaign in the Ottoman territories of Egypt and Syria, proclaimed to defend French trade interests, weaken Britain's access to British India, and to establish scientific enterprise in the region. It was the primary purpose of the Mediterranean campaign of 1798, a series of naval engagements that included the capture of Malta.
On the scientific front, the expedition eventually led to the discovery of the Rosetta Stone, creating the field of Egyptology. Despite many decisive victories and an initially successful expedition into Syria, Napoleon and his Armee d'Orient were eventually forced to withdraw, after sowing political disharmony in France, experiencing conflict in Europe, and suffering the defeat of the supporting French fleet at the Battle of the Nile.
The last time we saw an Egyptian Club Zoomorphic crocodile hilted sword sold was at Sotheby's in 2020, estimated at £60,000 to £80,000 gbp, but the blue and gilt to the blade was present and it had its scabbard.
The second to last photo in the gallery is of a painting of ‘The Glosters’, that fought at Waterloo.
The last photo in the gallery shows a photograph of one section of the collection in the museum of Waterloo, taken in around 1900, showing all the weapons of Waterloo en situ, including all the protagonists {British, French, Prussian and Belgian muskets, swords, pistols, armour uniforms, etc}. The museum was founded and owned by a veteran of the 7th Hussars that fought at Waterloo
No scabbard. read more
1750.00 GBP