

A Captivating, Plantagenet, War Of The Roses Era Bronze Ring, Circa 1455, With A Central Engraved Yorkist or Lancastrian Rose Surrounded By Four Rose Leaves. Likely Worn By A Plantagenet, Aide, or Supporter.
The House of Plantagenet ruled England in some form or another from the reign of Henry II, beginning in 1154, until the House of Tudor came to power when Richard III fell at the Battle of Bosworth Field in 1485, and thus the fall of the house of the Plantagenets, and the start of the Tudor Age.
It goes back to the Angevin counts (from 1360, dukes) of the western French province of Anjou. Three dynasties belong to it: Angevins, House of Lancaster (Lancastrians) and House of York (Yorkists). Lancastrians and Yorkists fought against each other the Wars of the Roses to get the crown for their dynasty alone.
The name "Wars of the Roses" refers to the heraldic badges associated with the two rival branches of the royal House of Plantagenet fighting for control of the English throne; the White Rose of York and the Red Rose of Lancaster.
It culminated in the defeat of King Richard IIIrd at the Battle of Bosworth field in 1485, and the start of the Tudor Age, who combined the white rose and the red rose to create the Tudor Rose.
Embryonic forms of this term were used in 1727 by Bevil Higgons, who described the quarrel between the two roses and by David Hume in The History of England (1754–1761):
The people, divided in their affections, took different symbols of party: the partisans of the house of Lancaster chose the red rose as their mark of distinction; those of York were denominated from the white; and these civil wars were thus known over Europe by the name of the quarrel between the two roses
Every single item from The Lanes Armoury is accompanied by our unique Certificate of Authenticity. Part of our continued dedication to maintain the standards forged by us over the past 100 years of trading read more
495.00 GBP

Most Incredible & Finest Quality King George IIIrd Napoleonic Wars Scottish Presentation Sword, Presented In The Months Following the Battle of Trafalgar The Regiment of Midlothian Infantry, East Midlothian, By the Officer's & Men of The New Battle Co.
This is a magnificent ‘royal grade’ museum piece, a sublime quality presentation sword, made with the finest copper-gilt mounts, silver panels, and a stunning blue and gilt blade with deluxe engraving and etched presentation panel. A sword of the highest rank, commissioned to be hand made by Mr Phillip Rundell & Mr George Bridge, partners of their company of personal goldsmiths to King George IIIrd, and one of the worlds finest makers of objects of magnificence, including the British Crown Jewels, universally recognised as the finest, and most valuable by far, suite of royal regalia in the world.
Formerly in the world famous Smithsonian Collection in Washington, America, sold by them over 25 years ago to raise an urgent need of funds.
In the days it was commissioned it would have been made for the equivalent and likely same cost of the £100 Lloyds Patriotic Fund Presentation Swords, that were presented to the heroes of the Royal Navy, such as that fought at Trafalger etc. Bearing in mind the value of £100 in 1806 was a simply remarkable sum, for example only 6% of the families in Britain had a total income of £100 in an entire year in 1806, an equivalent today of around £80,000.
Presentation inscription motto etched onto the blade reads;
‘Into whose hand
this sword is put,
It’s hop’t will not
fear Buonaparte,
So draw me out
I shine so clear
and if I strike
my foes may fear”
This fabulous sword, was made by Philip Rundell and George Bridge whose company later made The British Imperial State Crown, the most famous and important royal crown of state ever made, and last used by her Majesty Queen Elizabeth II for her coronation in 1953. This wondrous sword was formerly from the Smithsonian Collection in Washington, and is remarkably similar to the most valuable and highest quality presentation British swords of the Napoleonic Wars, the Lloyds Patriotic Fund sabres, that today can fetch up to £220,000, considerably more than they were achieving 40 years ago when we sold a fine £100 pound Lloyds sword, and even 20 years ago when we sold our last Lloyds £100 pound sword. This sword's makers were King George IIIrds personal goldsmiths, and made the Irish Crown Jewels in 1830, and Queen Victoria's Imperial State Crown " expressly made for the solemnity of the Coronation" That was last used by Her Majesty Queen Elizabeth IInd for her coronation. This spectacular sword is inscribed that its bearer should fight Napoleon Bonaparte without fear, but his foes The French will fear its startling brightness and beauty. It has a sharply curved blade, decorated with stands of arms, a crowned GR cypher, the king's Royal arms, a figure of Britannia, and the motto see photo in the gallery and another further Scottish regimental presentation panel on the opposing side of the blade see photo. The dedication reads;
Presented by the New battle company of
The Eastern Regt. of Midlothian Volunteer
Infantry, to David Wight Esq, their Captain
as a Mark of their Regard and Esteem, 1806
It has a superbly detailed classically styled stirrup hilt decorated with acanthus scrolls, oak leaves and acorns, with the langets decorated with stands of arms, it has a copper gilt simulated wire and ribbon bound grip, contained in its ornately mounted silver and copper gilt leather scabbard, each mount finely engraved and decorated with acanthus leaf bouquets and featuring a central oval silver plaque decorated with stands of arms, the upper mount with maker's panel. This amazing sword was formerly in the collection of the Smithsonian in Washington, USA, bequeathed to them by a famed American collector of Napoleonic arms, which they sold for the benefit of the Smithsonian's funds over 25 years ago. Blade 75 cm approx. Maker marked by Philip Rundell and George Bridge of London. The firm was appointed as one of the goldsmiths and jewellers to the king in 1797 and Principal Royal Goldsmiths & Jewellers in 1804, and the firm held the Royal Warrant until 1843. They served four monarchs: George III, George IV, William IV and Victoria. After the Congress of Vienna (1814–1815), the firm prepared 22 snuff-boxes to a value of 1000 guineas each to be given as diplomatic gifts.
In 1830–1831, the firm created the Irish Crown Jewels from 394 precious stones taken from the English Crown Jewels of Queen Charlotte and the Order of the Bath star of her husband George III, and Queen Victoria's Imperial State Crown for her coronation. Despite the incredible success of the Battle of Trafalgar, and the routing of Napoleon’s French and Spanish fleet by Admiral Nelson, concern was still great amongst the people of Britain, in fact it was never greater, of the fear that Bonaparte would continue his efforts to confound and attempt to conquer Britain and its empire, and thus to create his own empire controlling all of Europe And Russia. Rundells quality of workmanship was so fine and renowned throughout the world that there are over 100 items by Rundells in the Royal collection alone.
This wonderful sword was obviously worn with pride by its recipient officer, thus the blade shows commensurate signs of light surface wear as to be expected.
We can, if required, commission a contemporary, bespoke glazed & framed display cabinet made by our local specialist artisan. Perfectly suitable for table or wall mounting. With several options of wood framing types, such as gilt, black or silver, also with coloured velvet backing options, and a suitably engraved brass plaque if required.
The scabbard has a blank silver panel on the inner throat mount that could have been presentation engraved but hasn't been read more
36950.00 GBP

A Most Attractive Koto Wakizashi Attributed to Kanemune of Etchu, 1532 WIth Japanese Attribution Papers
Uda school blade with bo hi to both sides. Fine sugaha hamon with mokume hada. Edo period Goto school mounts in shakudo patinated copper and gold depicting carved shi shi lion dogs. Menuki of shakudo and gold dragons. Iron Edo tsuba of fan formed windows, with Amidayasuri. NTHK certificated in 2003 as attributed to Kanemune of Etchu by a previous owner. The founder of the Uda School is considered to have been Kunimitsu. He was originally from the Uda district of Yamato Province. He worked around the Bunpo Era or 1317 at the end of the Kamakura Era. All of the succeeding smiths of this school used the kanji character â"Kuni", in their signatures. At some point he moved to Etchu Province so even though the Uda School had its foundation in the Yamato tradition, it is considered to be one of the wakimono schools from this region together with such schools as he Fujishima and Chiyozuru. Together these three schools are often referred to as the kita kuni mono.
Since remaining works by Kunimitsu are non-existent, his students, Kunifusa and Kunimune, are generally thought to be the true founders of this school. Both of these smiths studied under Norishige of the Etchu Province and they were active around the Koan Era (1361). The works of these early Uda smiths followed the style of the Yamato Den particularly in the areas of sugata and hamon. We rarely have swords with papers for our swords mostly came to England in the 1870's long before 'papers' were invented, and they have never returned to Japan for inspection and papers to be issued. However, on occasion we acquire swords from latter day collectors that have had swords papered in the past 30 years or so. this is one of those. It is important to bear in mind, that due to the revered status that Japanese swords achieve for most of their working lives in Japan, that the condition they survive in can be simply remarkable. One can see just how remarkable it can be, by comparing the condition of this fine sword that was made around the same time as the early Tudor period of King Henry the VIIIth to any equivalent aged, surviving, early Tudor period sword, from any country outside of Japan, and that comparison will show just how fine any Japanese sword’s state of preservation, from the same era, truly can be.
28 inches long overall in saya, 21.5 inch long blade tip to tsuba. read more
4950.00 GBP

Newly Arrived, Ancient Briton & Viking Artifacts. Including Ancient Viking War Hammer Axe Heads & A Rare Ancient Viking Hammer Adze For Viking Long Boat & Roundhouse Construction Found Near Camphill, North Yorkshire, Circa 1870's
The pieces we have acquired are wonderful antiquities from the Bronze Age, Ancient Briton and the Viking Norman era. Some truly wonderful and historical collectables, of incredible rarity and beauty. One artefact is a simply stunning, up to 1000 years old, a carved stone ancient British corbel, weighing almost 55 pounds, from such as a Norman church, monastery or even castle. It is a fabulous carved head of a the grimacing first man, Adam, he from the Garden of Eden, as told in the Old Testament Book of Genesis. His face likely revealing his regret of his being cast out by God, with his wife Eve, to face the misery of life after leaving God’s paradise, after succumbing to the serpents temptation via Eve. No doubt an allegory of the warning of the consequence that awaits those that fail in their devotion and duty. Interestingly it is one of the great historic myths that it was an apple tree within which the serpent appeared, with his poisonous apple, but there is no mention of an apple or apple tree at all in the tale. It was simply the fruit of the forbidden tree that bore peri, which just means fruit, of no particular or defined kind. It could just have easily been a peach, or even a kumquat.
The tradition of using carved stone corbels perhaps derives from stone vaults, although their ribs normally rise from capitals on wall shafts and these are usually foliate or moulded. However, Romanesque churches had external corbels below the eaves which have their architectural origins in classical brackets (and before that, the ends of roof timbers). Although most frequently carved as human heads, they could be animals, figures or grotesques. Explaining the relative lack of external decoration of churches in comparison with their interiors, William Durandus {who died in Rome in 1296 wrote: ‘for although its outward appearance be despicable, the soul which is the seat of God is illuminated from within’. It has therefore been taken that the grotesques and gargoyles seen on church exteriors are there to defend the building (heaven) and those within it from ever-present evil by fighting the Devil with his own. While literacy increased in the Middle Ages, the great majority of people entering a church would not have been able to read (and in any case, any script was most likely to be in Latin before the 16th century). Medieval people certainly recognised many more scenes from the Bible than modern churchgoers, but there were plenty of other sources of inspiration for painted and carved decoration. Hagiographical stories were widely used to convey Christian messages of morality and duty, yet the stories that concluded in considerably less than perfection also convey the consequences of failing to abide by such positive devotions. Thus in this case Adam started as the ideal of hagiographical perfection, at least in God’s eyes, but faced the painful reality after falling from God’s grace and his expulsion from paradise.
The first war hammer axe will be shown shown is in very nice condition for it's age, 8 inches long, and finely conserved. The front has a fine blade, with the reverse made into a flat, helmet smashing hammer. For combat, as a middle-heavyweight axe, it could have been mounted with a single or double handed haft. In a discussion on axes from the medeavil age we had together with Howard Blackmore {deputy curator at the Tower}, and Dennis Ottrey {our former gun and armour smith of over 40 years} the service of the war axe in hand to hand combat was critical in all the major battles for over a millennia. The lighter wide bladed axe, perfect for deep slicing and cutting, the heavy axe, for smashing and crushing, but often the most formidable, like the hand and a half sword in the world of long edged weapons, aka the bastard sword, the middle weight axe was the most functional. At home set in either a single handed short or two handed long haft, it was almost ideal for all purposes, and like the ‘bastard’ sword, it was perfect {in the right hands} for all fighting conditions. The hand-and-a-half sword was known as the ‘bastard’ sword because in trained hands it was far more powerful than the shorter, knightly cruciform sword, and much faster than the considerably longer zweihander {two handed} sword. Thus the middle-heavyweight axe could well have been classified as the ‘bastard’ axe. Although in hand-to-hand combat the only ideal defence against the war axe was the shield {or, possibly, superior agility} not another axe, unlike sword-to-sword combat, where the best defence against the sword, was another sword.
As well as axes we have a very rare original Viking hammer-adze, a vital tool for Viking long boat construction, and both the axes and the adze are around 1200 years old
All Viking ships were clinker built; the planks were overlapped at one edge and riveted together. In clinker shipbuilding you start build the outside first, and then put a frame inside it.
Viking ship frames are like display cases of grown timbers. For instance, the stem and stern posts would be taken from large, curved branches. Where two parts of the frame are to meet (usually a weak spot that needs re-enforcement) the Vikings used a single timber, cut from a branching element of a tree. On smaller vessels, where the oars didn’t pass through oarholes, the tholes (or rowlocks) were made from the junction of a branch with the trunk – putting the strongest part of the wood at the point of most strain.
Viking houses were built of wood. The longhouses had bowed walls in plan, forming a ship-like outline. The walls were lined with clay or consisted of wooden planks placed vertically into the ground, which supported the roof, along with two rows of internal posts. Outside the house was often supported by sloping posts. Roofs were slanted and could be thatched or wooden.
Renown scholar Alcuin of York was back at Charlemagne's court by at least mid-792, writing a series of letters to Æthelred, to Hygbald, Bishop of Lindisfarne, and to Æthelhard, Archbishop of Canterbury in the succeeding months, dealing with the Viking attack on Lindisfarne in July 793. These letters and Alcuin's poem on the subject, "De clade Lindisfarnensis monasterii", provide the only significant contemporary account of these events. In his description of the Viking attack, he wrote: "Never before has such terror appeared in Britain. Behold the church of St Cuthbert, splattered with the blood of God's priests, robbed of its ornaments.
The Vikings began arriving en masse with armies intent on conquest. These armies were led by Ivar the Boneless, Halfdan, and Ubba, three of the sons of Ragnar Lodbrok, who had been killed by the Northumbrian King Ælla. The first English city to fall to the invaders was York, conquered in 866. The Northumbrians tried in vain to retake the city, and King Ælla was killed in the process. One-by-one, other Saxon realms capitulated until virtually all of north and eastern England was under the direct control of the Danes.
At this point, the strongest Anglo-Saxon kingdom was Wessex, and upon the death of its king Æthelred, Alfred succeeded the throne and took the fight to the Vikings in England, who had begun annexing huge chunks of Mercia, an ally of Wessex. Alfred’s initial campaign against the Vikings was, however, a complete failure. Anglo-Saxon military tactics and defenses were incapable of dealing with Viking raids, and Alfred was eventually forced into hiding in the Somerset Marshes. The Vikings in England had succeeded in opening up the whole of Anglo-Saxon England to their mercy.
In 878, King Alfred came out of hiding and met with the lords still loyal to his cause. During his time in the Somerset Marshes, he had carefully planned a major counter-offensive against the Danish Viking army under Guthrum. Alfred’s campaign was successful, and Guthrum’s army was beaten, first in the field at Edington and then starved into submission at Chippenham. Several years later, a boundary was established, dividing England in two, with one half under Anglo-Saxon control and the other half, known as the Danelaw, under the control of the Vikings.
King Alfred organized better defenses, as well as a powerful free-standing army better equipped to deal with Viking tactics. As a result, subsequent raids and a major invasion attempt were thwarted. The Vikings who were part of this invasion attempt either ended up settling in Danelaw or sailing to Normandy and settling there.
Beyer, Greg. "The Vikings in England (Or were they Danes?)" TheCollector.com, March 11, 2023, https://www.thecollector.com/danes-or-vikings-in-england/
Title page of a late manuscript of the Prose Edda written by Snorri Sturluson (13th century), showing the Ancient Norse Gods Odin, Heimdallr, Sleipnir, and other figures from Norse mythology, plus the legendary axe hammer.
The Tjängvide image stone with illustrations from Norse mythology
By Berig - Own work, CC BY-SA 4.0, https://commons.wikimedia.org/w/index.php?curid=3682858
Showing axe hammers in combat and a Viking longship read more
Price
on
Request

1000 Year Old Superb Crusades Period Bronze Status Ring of A Norman Knight of Christ of The 1st Crusades. Depicting Christ Bearing His Crucifix for The Crucifixion. In Excellent Condition with Fine Original Age Patination
a higher ranked crusader knight, such as a knights templar would wear a pectoral crucifix and one of higher status knight, such as a bishop {crusader knights were often warrior monks of all status and ranks} would also wear a symbolic Christian ring. William the Conqueror's half brother Odo, Bishop of Bayeux and Earl of Kent, a warrior bishop, was perhaps the most feared and hated man in England during the late 1060 and throughout the 1070s, with a black and brutal reputation as his half-brother's enforcer.
Odo was a close advisor and half-brother of King William the Conqueror, playing an important role before, during and after the Norman Conquest of 1066, even being famously present at Hastings itself.
A hoop shaped ring in bronze, the engraved platform section is hexagonal with an engraved Christ bearing his cross, the shoulders of the hoop that adjoin the top are the heads of beasts, possibly wolves or snakes.
While often associated with evil and the devil, the wolf can also represent the wildness and strength of the wilderness in which Jesus was tempted, or, in some cases, is associated with St. Francis of Assisi's connection with animals.
Snakes can symbolize both healing and wisdom in some contexts, while also representing the serpent of the Garden of Eden and the devil in others as depicted in the temptation of Christ.
The First Crusade, initiated in 1096, was the first of a series of religious wars, or Crusades, led by the Latin Church to reclaim the Holy Land from Islamic rule.
Used in the early Crusades Period by higher ranked Knights, such as the Knights of Malta Knights Hospitaller, the Knights of Jerusalem the Knights Templar, the Knights of St John.
The new Norman rulers were culturally and ethnically distinct from the old French aristocracy, most of whom traced their lineage to the Franks of the Carolingian dynasty from the days of Charlemagne in the 9th century. Most Norman knights were of settled Viking stock, and remained poor and land-hungry, and by the time of the expedition and invasion of England in 1066, Normandy had been exporting fighting horsemen for more than a generation. Many Normans of Italy, France and England eventually served as avid Crusaders soldiers under the Italo-Norman prince Bohemund I of Antioch and the Anglo-Norman king Richard the Lion-Heart, one of the more famous and illustrious Kings of England.
The Poor Fellow-Soldiers of Christ and of the Temple of Solomon also known as the Knights Templar, or simply the Templars, was a Catholic military order founded in 1118, and were headquartered on the Temple Mount in Jerusalem through 1128 when they went to meet with Pope Honorius II. They were recognised in 1139 by the papal bull Omne datum optimum of Pope Innocent II. The order was active until 1312, when it was perpetually suppressed by Pope Clement V by the bull Vox in excelso.
The Templars became a favoured charity throughout Christendom, and grew rapidly in membership and power. Templar knights, in their distinctive white mantles with a red cross, were amongst the most skilled fighting units of the Crusades. They were prominent in Christian finance, non-combatant members of the order, who made up as much as 90% of their members,managed a large economic infrastructure throughout Christendom.They developed innovative financial techniques that were an early form of banking, building its own network of nearly 1,000 commanderies and fortifications across Europe and the Holy Land,
The Templars were closely tied to the Crusades; With its clear mission and ample resources, the order grew rapidly. Templars were often the advance shock troops in key battles of the Crusades, as the heavily armoured knights on their warhorses would set out to charge at the enemy, ahead of the main army bodies, in an attempt to break opposition lines. One of their most famous victories was in 1177 during the Battle of Montgisard, where some 500 Templar knights helped several thousand infantry to defeat Saladin's army of more than 26,000 soldiers, When the Holy Land was lost, support for the order faded. Rumours about the Templars' secret initiation ceremony created distrust, and King Philip IV of France, while being deeply in debt to the order, took advantage of this distrust to destroy them to erase his debt. On Friday the 13th of October 1307, he had many of the order's members in France arrested, tortured into giving false confessions, and burned them at the stake.
Pope Clement V disbanded the order in 1312 under pressure from King Philip. The abrupt reduction in power of a significant group in European society gave rise to speculation, legend, myth, and legacy through the ages
The first crusade was launched after a request for aid from the Byzantine Emperor, it was a response to the expansion of Islam and the difficulties faced by Christian pilgrims in the Holy Land.
Pope Urban II called for the First Crusade in 1095 at the Council of Clermont, encouraging Western Christians to aid the Byzantine Empire and liberate Jerusalem.
Crusaders were motivated by a variety of factors, including religious salvation, opportunities for renown, economic gains, and fulfilling feudal obligations.
The First Crusade was led by Frankish and Norman nobility, including Raymond of Saint-Gilles, Godfrey of Bouillon, and Bohemond of Taranto, among
Crusaders captured Nicaea in 1097 and Antioch in 1098, ultimately besieging and conquering Jerusalem in July 1099.
The First Crusade established four Crusader states in the region: the Kingdom of Jerusalem, the County of Tripoli, the Principality of Antioch, and the County of Edessa. Around 60,000 soldiers and at least half again of non-combatants were involved in the First Crusade which set off on their quest in 1095. After campaigns in Asia Minor and the Middle East, great cities such as Nicaea and Antioch were recaptured, and then the real objective, Jerusalem itself. Many more crusades would follow, the objectives would widen, as would the field of conflict, so that even Constantinople would come under attack in subsequent campaigns.
While initially successful, the Crusader states faced ongoing challenges from Muslims who sought to reclaim the Holy Land. The First Crusade was considered a pilgrimage for many, and most crusaders returned home after Jerusalem's capture, leaving the newly established states vulnerable.
Picture in the gallery of the warrior Bishop Odo at the battle of Hastings bearing his bishop's mace/club HIC ODO EPISCOPUS BACULUM TENENS CONFORTAT PUEROS ("Here Bishop Odo, holding a club, gives strength to the boys")
Every single item from The Lanes Armoury is accompanied by our unique Certificate of Authenticity. Part of our continued dedication to maintain the standards forged by us over the past 100 years of our family’s trading, as Britain’s oldest established, and favourite, armoury and gallery.
Approx one inch across UK size R read more
875.00 GBP
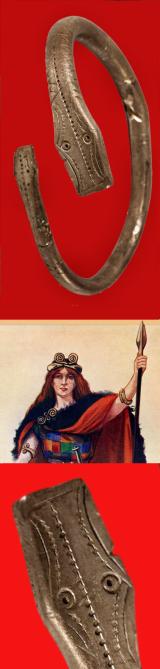
Stunning 2000 Year Old, Ancient Celt, Pagan, Status Jewel. An Original Celtic Silver Coiled Serpent Bracelet Armilla From the Time of King Prasutagus & Used By Nobility Of The Era of Queen Boadicea, Queen of the Iceni,, The Ancient Briton Ruler
Representing Cernunnos, the ram horned serpent A Celtic pagan deity, sometimes depicted with horns, and as a serpent, Cernunnos represents the earth, fertility, and the cycles of nature. A Cernunnos high status ‘serpent’ form armilla of a round spiral coil body in worked silver, punch engraved with zig-zag scales, with a flattened head with punched decoration for its eyes and curved flat horns. The ram-horned serpent (as depicted with its flattened head) was a cult image found in north-west Europe before and during the Roman period. It appears three times on the incredible Celtic historical artefact the Gundestrup cauldron, similarly decorated with punch engraving, and in ancient Romano-Celtic culture was closely associated with the horned or antlered god Cernunnos, in whose company it is regularly depicted, being held in his left hand. This pairing is found as early as the fourth century BC in Northern Italy, where a huge antlered figure with torcs and a serpent was carved on the rocks in Val Camonica.
Queen Boudicea of the Iceni {also known as Queen Boudicca} was the very first recorded warrior queen of Briton and one of the most famous rulers of all early British history before 1066. Famously depicted by a larger than life bronze statue in London driving into combat, her chariot into the imagined Roman legions This stunning and iconic piece of Celtic silver pagan status jewellery, the armilla, was made from, circa, early to mid 1st century. The Latin name for a bracelet in Antiquity, an armilla, applied to the Greek, Celt and Roman peoples. Boudicca is frequently depicted in art adorned with at least one coiled status serpent form armilla on an arm, often clasping her spear.
The Iceni, whose name might have come from Iken, the original name of the River Ouse, where the tribe are said to have come from, had settlements across Norfolk, in north Suffolk and east Cambridgeshire. One of them was at Brettenham on the Peddars Way, east of Thetford, which was built by Romans to quickly transport troops up to The Wash and Brancaster, where they had a fort protecting north Norfolk.
Queen Boudicca waged war against the Romans in Britain from 60 AD after the Romans decided to rule the Iceni directly and confiscated the Norfolk property of the leading tribesmen. The uprising was motivated by the Romans' failure to honour an agreement they had made with Boudica's husband, Prasutagus, regarding the succession of his kingdom upon his death, and by the brutal mistreatment of Boudica and her daughters by the occupying Romans.
Boudicca's warriors successfully defeated the Roman Ninth Legion and destroyed the capital of Roman Britain, then at Colchester. They went on to destroy London and Verulamium (St Albans).
Thousands were killed. Finally, Boudicca was defeated by a Roman army led by Paulinus. Many Britons were killed and Boudicca is thought to have poisoned herself to avoid capture.
The site of the battle, and of Boudicca's death, are unknown.
Iceni warriors may have laid waste to Silchester
Professor Fulford said that in excavations at Silchester they had found evidence of a major military occupation at Calleva (now called Silchester) in 40 AD, then destruction between 60 and 80 AD, including wells that were filled in at this time and burned buildings.
"The settlement is completely wiped out somewhere between 60 AD and 80 AD.
Not only an incredibly beautiful ancient work of art, it is a unique artefact of ancient Celtic history, and a fabulous statement piece for any fine collection. It could look amazing frame mounted.
Queen Boudicea was also spelt Boudicca, or Boudica In the time of the Ancient Briton Celts revolt against the might of Rome. A wonderful original There is so few opportunities to own a wonderful piece from the time of Boudicca Queen of the Iceni of ancient Briton. There are no known surviving artefacts of hers, but to own a significant piece of potentially one of her nobles is wonderful. About the time of Claudius' triumph in AD 43 (a century after Caesar's expeditions), Pomponius Mela, the first Roman geographer, says of the Britons that
"they fight not only on horseback and on foot, but also in wagons and chariots bigis et curribus, and are armed after the manner of the Gauls. They call those chariots covines which are set with scythes round about the naves falcatis axibus" (De Chorographia, III.43; first translated by Arthur Golding in 1585 and modernized here). In AD 60 or 61, when the Roman governor Gaius Suetonius Paulinus was campaigning on the island of Mona (modern Anglesey) on the northwest coast of Wales, Boudica led the Iceni, the Trinovantes, and others in revolt. They destroyed Camulodunum (modern Colchester), earlier the capital of the Trinovantes but at that time a colonia, a settlement for discharged Roman soldiers and site of a temple to the former Emperor Claudius. Upon hearing of the revolt, Suetonius hurried to Londinium (modern London), the 20-year-old commercial settlement that was the rebels' next target. He lacked sufficient numbers to defend the settlement, and he evacuated and abandoned Londinium. Boudicca led a very large army of Iceni, Trinovantes, and others against a detachment of Legio IX Hispana, defeating them, and burning Londinium and Verulamium.
An estimated 70,000-80,000 Romans and British were then killed in the three cities by those following Boudicca, many by torture. Suetonius, meanwhile, regrouped his forces, possibly in the West Midlands; despite being heavily outnumbered, he decisively defeated the Britons. The crisis caused Nero to consider withdrawing all Roman forces from Britain, but Suetonius's victory over Boudicca confirmed Roman control of the province. Boudicca then either killed herself to avoid capture (according to Tacitus), or died of illness (according to Cassius Dio) Beginning around the 3rd century BC, Celts of the regions around the Marne and the Moselle Rivers began burying their chieftains in light, two-wheeled chariots with their sword, shield, spears, and drinking vessels. Similar chariot graves from this era are also found in the British coastal regions of Yorkshire. The evidence for the use of these vehicles is clear. A Roman coin from 110 BC dramatically depicts the naked Gallic warrior-king Bituitus of the Averni casting spears from his chariot. And documentary evidence of the chariot in combat on the European continent is left to us by the Roman poet Propertius. In describing the fighting between the forces of Republican Rome and 30,000 howling Celtic warriors in 222 BC, Propertius depicts the chieftain Viridomar ‘clothed in striped trousers’ hurling javelins from his chariot with deadly accuracy. In fact, many of the Latin words for chariot-carpentium, carrus, essendum have Gaulish roots.
The use of chariots in combat in Gaul apparently died out before Caesar’s campaign of the 50s BC, because Caesar makes no mention of them, though he did of Gallic cavalry, in his Gallic Wars. But chariots certainly remained in Britain, though few have been found there into the Caesarian era and beyond, because they are included in the writings of Caesar, Tacitus, and in the old Irish epic the ‘Tain Bo Cuailnge’ (The Cattle Raid of Cooley) composed in part around the 2nd century AD. Evidence of early Celtic chariot use is gleaned primarily from the excavation of graves of noble warriors.The first Roman expedition to Britain was a reconnoiter of the island by Julius Caesar in 55 BC, purportedly to suppress the reinforcements being given the native tribes in Gaul. There, chariots no longer were being used, and the ambush of a legion caught in the open and but surrounded by the cavalry and chariots of the Britons provides an excursus by Caesar on their tactics, so unfamiliar to the Romans.
"In chariot fighting the Britons begin by driving all over the field hurling javelins, and generally the terror inspired by the horses and the noise of the wheels are sufficient to throw their opponents' ranks into disorder. Then, after making their way between the squadrons of their own cavalry, they jump down from the chariot and engage on foot. In the meantime their charioteers retire a short distance from the battle and place the chariots in such a position that their masters, if hard pressed by numbers, have an easy means of retreat to their own lines. Thus they combine the mobility of cavalry with the staying power of infantry; and by daily training and practice they attain such proficiency that even on a steep incline they are able to control the horses at full gallop, and to check and turn them in a moment. They can run along the chariot pole, stand on the yoke, and get back into the chariot as quick as lightning" (Gallic War, IV.33). An example from Ingolstadt, Germany, in Megaw, R.& V. Celtic Art. From its Beginnings to the Book of Kells,
London, 1989. For example a denarius coin was minted by the moneyer Lucius Hostilius Saserna in 48 BC, following Caesar's campaign in Gaul. The reverse depicts a naked Celtic warrior holding a spear and small shield, while a crouched figure drives the horses with a whip.
The armilla is 8 cm wide overall weighing approx two ounces
for reference;
Cf. Megaw, R.& V., Celtic Art. From its Beginnings to the Book of Kells, London,
The Megaws investigate the antecedents of Celtic art, the styles and motifs employed, the relationship of the Celts and their art to the ancient civilizations of the Mediterranean, and the magnificent maturity of Celtic art in Britain and Ireland. They include major discoveries that have been made as the result of highway and rail construction and the results of detailed surveys of known sites, such as the recovery of the remarkable stone sculpture from the Glauberg northwest of Frankfurt. Continuing work at old sites such as the saltmining complex of the Durrnberg just south of Salzburg has produced new treasures, and important finds in Central and Eastern Europe and in the British Isles have necessitated a change in emphasis with regard to questions of origin and development. Vincent Megaw is currently Professor of Visual Arts and Archaeology, Flinders University, Adelaide, Australia, and Visiting Professor in the Department of Archaeology, University of Edinburgh; he is also Honorary Research Fellow in the Department of Archaeology, University of Glasgow.
The Armilla, a bracelet or armlet, was worn by both men and Celtic women of status in ancient times. In Roman it could be of such high status it was awarded to a Roman legionary as regard for great feats of combat.
See; the Celt cauldron Gundestrup boiler, inside Description Gundestrup boiler, inner plates, Y.FRJ, Rævemosen, Ålborg County, in the gallery with the depiction of the flattened horn headed deity serpent held in Cernunnos‘s hand.
Every single item from The Lanes Armoury is accompanied by our unique Certificate of Authenticity. Part of our continued dedication to maintain the standards forged by us over the past 100 years of our family’s trading, as Britain’s oldest established, and favourite, armoury and gallery.
https://creativecommons.org/share-your-work/licensing-considerations/compatible-licenses/. https://natmus.dk/museer-og-slotte/nationalmuseet/ read more
2450.00 GBP

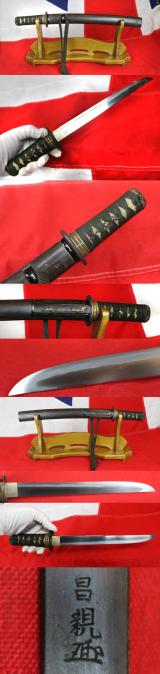
An Absolutely Superb, & Signed, Samurai’s Large Sunobi-Tanto or Wakazashi Late Koto to Early Shinto Period. Mutsu no Kami Daido School. Carved Horimono Blade With Bonji, of Fudō-myōō (不動明王), & Buddhist Ken Sword. Nabeshima Clan
The blade, around 400 years old, is very wide and powerful, and has horimono carved to both sides, of ancient Buddhist ken swords, one with a varjira a Buddhist god's lightning creator and the swirling grain in the hada looks absolutely stunning, but it has to be viewed in the right light, with a typical narrow suguha hamon. Beautiful shakudo and pure gold Mino Goto school fuchigashira of takebori water dragon on a nanako ground, with an iron ground matching water dragon tsuba, possibly 3rd or 4th generation Jakushi, from the first half of the 18th century. Chinese-style dragons became a popular subject for Jakushi carvers. Two-toed dragons indicate nothing more than the Jakushi carvers’ bold appetite for artistic license. This piece resembles designs by the second generation, Shiraki Kizaemon, whose works were copied by the third. The founder of the school Kawamura Fukuyoshi, studied painting under Shoyu Itsunen, the Chinese-born abbot of Kofukuji temple in Nagasaki. It appears that Kawamura took the art-name Jakushi (young turf), and collaborated with Kizaemon to transfer his painting ideas into metal, as sword-fitting. Kizaemon and his descendants kept the name Jakushi.”.
It bears the clan mon of the Nabeshima.The clan initially aided Ishida Mitsunari against Tokugawa Ieyasu in the Sekigahara Campaign in 1600. Which is when this fabulous sword dates from. However, they switched sides to support the Tokugawa, who were ultimately victorious, before the campaign had ended, battling and occupying the forces of Tachibana Muneshige, who was thus prevented from contributing directly to the battle of Sekigahara. Though regarded as tozama daimyō ("outside" lords), and assigned particularly heavy corvée duties, the Nabeshima were allowed to keep their territory in Saga, and in fact had their kokudaka increased. The clan's forces served the new Tokugawa shogunate loyally in the years which followed; they remained in Kyūshū during the 1615 Osaka Campaign as a check against a possible rebellion or uprising by the Shimazu clan, and aided in the suppression of the Shimabara Rebellion of 1637. In recognition of their service, members of the clan were granted the prestigious family name Matsudaira in 1648.
Nanako Ji: "fish roe ground" A surface decoration produced by forming very small raised bosses by a sharply struck punch or burin called 'nanako tagane'. Shakudo is the metal most often used, but copper and gold are quite often employed. The harder metals, shibuichi, silver and iron are rarely decorated in this way. The size of the dots vary from 0.04" to 0.008" (25 to 125 and inch) and the regularity of the work is marvelous as the dots must be spaced entirely by touch. The dots are usually arranged in straight lines or in lines parallel to the edge of the piece being decorated, but sometimes in more elaborate patterns. Used on guards since the Momoyama period although the technique existed since much earlier periods. Usually done by specialist 'nanako-shi', but sometimes done by the maker of the guard himself.
A pair of pure gold and shakudo flowering menuki under the tsukaito, and are of wonderful quality, and a stunning shakudo decorated kozuka utility knife with the Nabeshima clan mon of the Daki Myoga ginger plant, and the blade is also fully signed, is set within the saya pocket. The original Edo saya is fabulously decorated with kairagi polished giant rayskin. "Kairagi" means "Ume Blossom Skin".
When you polish the skin, Ume Blossom patterns will appear. Kairagi-same is very rare. The saya is polished samegawa. Polished giant ray skin, samegawa, was, at the time of the Samurai, some one of the most expensive and highly prized forms of decoration to be used on sword scabbards Saya. It was the same material as is used on sword hilts under the binding, but the large and small protruding nodules were hand polished, for hundreds of hours, to create a highly polished flat surface, that was then hand dyed and thus created a decorated scabbard with immense natural beauty, and huge expense for the time. The name Daido is most interesting, his early name is Kanemichi, and he changed to “O”Kanemichi when he received the “O” or “Dai” kanji from the Emperor Ogimachi. Later he called himself “Daido” and then received the title of “Mutsu No Kami” in Tensho 2. It is also believed that he was the personal swordsmith to Oda Nobunaga and the fact that he moved to Kyoto at the same time Nobunaga established his residence in Kyoto seems to support this idea. There are Juyo-Token by him, as well as joint effort works with Horikawa Kunihiro. The Horimono are double edged Buddhist ken straight sword, and a Bonji of 'Fudo' warrior deitie. Fudō-myōō (不動明王) is the full Japanese name for Acala-vidyaraja, or Fudō (o-Fudō-sama etc.) for short. It is the literal translation of the Sanskrit term "immovable wisdom king". The sword engraved on this sword is as a kongō-ken (金剛杵 "vajra sword"), which is descriptive of the fact that the pommel of the sword is in the shape of the talon-like kongō-sho (金剛杵 "vajra") of one type or another. It may also be referred to as "three-pronged vajra sword. The blade 17.5 inches long tsuba to tip, overall 25.5 inches long in saya read more
6350.00 GBP
A Beautiful Antique Edo Period 1598-1868 Tanto Signed Satsuma ju Yoshizane
In all original Edo period mounts fittings and saya, stunning ishime stone finish lacquer to the saya in pristine condition.
Kozuka utility knife also signed with maker's signature. See photo 10 in the gallery
Pair of menuki of gold embellished flower sprays, iron silver inlaid kashira, gilt and nanko fuchi.
Blade in full traditional stone polish showing a delightful notare hamon.
Tanto are generally forged in hira-zukuri style (without ridgeline), meaning that their sides have no ridge line and are nearly flat, unlike the shinogi-zukuri structure of a katana. Some tanto have particularly thick cross-sections for armour-piercing duty, and are called yoroi toshi. Tanto first began to appear in the Heian period, however these blades lacked artistic qualities and were purely weapons. In the Early Kamakura period high quality tanto with artistic qualities began to appear, and the famous Yoshimitsu (the greatest tanto maker in Japanese history) began his forging. Tanto production increased greatly around the Muromachi period and then dropped off in the Shinto period. Shinto period tanto are quite rare. Tanto were mostly carried by Samurai; commoners did not generally carry them. Women sometimes carried a small tanto called a kaiken in their obi for self defence. It was sometimes worn as the shoto in place of a wakizashi in a daisho, especially on the battlefield. Before the 16th century it was common for a Samurai to carry a tachi and a tanto as opposed to a katana and a wakizashi.
. read more
3750.00 GBP
Many, Many Thousands of Historical Books Available, From Early Incunabala, First Editions, Early Antique Publications, Plus Vintage, Modern, & Second Hand. With Up to 50 New Additions Every Day, & 126 Arrived Just Yesterday!
Price shown below for illustration purposes only, of our starting price of our second hand {specialist military or historical} hard-backs.
Almost 20 years ago The Lanes Armoury, Bookshop Dept. made a special appearance, with a most kind and complimentary reference, in “The Sunday Times Culture Magazine’, especially its specialist bookshop section, in March 2006, and we continue to trade in our specialist books as much now as we did then, despite the demise of many of Britain’s fine bookshops.
Mark’s interest in historical books was partly honed by his good school friend, with whom he shared a study at college in the 1960’s just into the early 70’s, Robert Foyle, of, probably, the world’s most famous bookshop family, Foyles of London. We cannot begin to emulate Foyles, {who could!} but we do have many thousands of books, early antique and vintage, and as books are our largest single selling line we have just too many pass through our hands to even begin to list them all in stock, but we do try to list all our 1st Editions if possible.
Please email us if you seek a particular item you don't see available. We are, as usual, actively seeking rare old books with a historical interest. A short time ago, for one example, we had an urgent request for a very rare and valuable 50k+ gbp numbered & signed subscribers edition of "The 7 Pillars of Wisdom", by T.E. Lawrence, and we eventually located a superb one, after a 10 year search. and it was sold by us within hours.
The price shown below is an illustration of the average price of one of our regular modern, hardback, second-hand, historical or militaria books, of course our antique leather bound books can vary in price enormously from £50 to £5,000, depending on age, but more importantly, on rarity read more
15.00 GBP
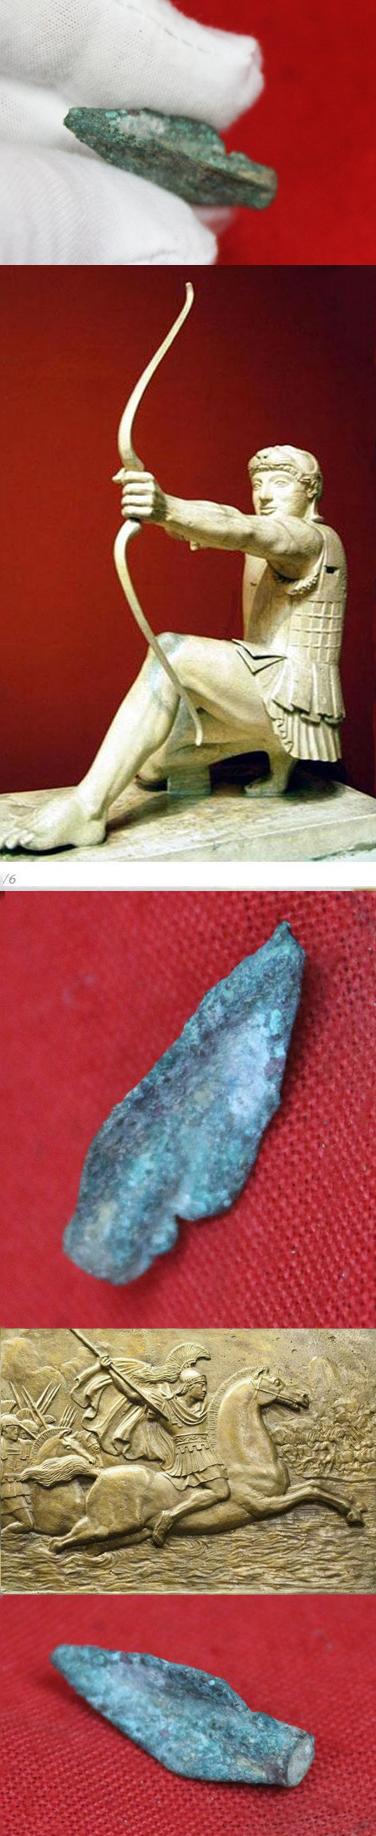
An Original Arrowhead From the Time of Alexander the Great’s War Against Persia, The Battle of the Granicus River, in 334 BC. The Battle Site Was Near The Legendary Site of the City of Troy.. Acquired On a Grand Tour in 1820
A stunning conversation piece, that would make a unique gift for a friend or loved one. Original, small arrow head in delightful condition showing good and beautiful natural aged ancient patina. They were all small heads at that time, as the arrow haft and flight was long and naturally did the major part of the action, but that was the organic part of the complete arrow, that simply rot away within a century in the ground, just leaving the remarkable bronze age head remaining.
Acquired in the 1820's while on a Grand Tour of Northern France and the
Ottoman Empire.
Discovered over 200 years ago in the region of The Battle of the Granicus River during what was known at the time as 'The Grand Tour'. And acquired by us as part of a collection of original antiquities from the Hamilton family of Scotland.
We are very privileged to be the UK’s premier original military antiques gallery and website, and to be able to consistently, continually, and regularly, offer the finest original collectors items in our shop for over 100 years
Fought in May 334 BC it was the first of three major battles fought between Alexander the Great and the Persian Empire. Fought in Northwestern Asia Minor, near the site of Troy, it was here that Alexander defeated the forces of the Persian satraps of Asia Minor, including a large force of Greek mercenaries led by Memnon of Rhodes.
The battle took place on the road from Abydos to Dascylium (near modern-day Ergili, Turkey), at the crossing of the Granicus River. Where the ancient Greeks best perceived the need for archers was
when an expeditionary force came to them: if an ancient city knew a siege was facing them, what preparations would they make As Mitylene prepares to secede from the Athenian Empire (428), we see the city taking three preparations to undergo a siege:
one was to buy grain,
second was to raise the height of the walls, and
the third was to bring in archers from Thrace.
In a siege, the defenders always have the height advantage. They are throwing or shooting from the city walls, the offense is shooting from the ground. Mathematically, the height advantage goes with the square root of two. If, for instance, you are shooting from twice as high, your arrow goes 1.414 times as far. If you are on a battlement 50 feet high, and your opponent is shooting from five feet high, your arrow goes seven times farther than his.
(This is purely mechanical, ignoring aerodynamics.)
The bow, among the Greeks, was the principal weapon for the city besieged. The bow being so effective in this situation explains why the first advance in ancient siege machinery was the movable tower. This
is the invention of Dionysius of Syracuse. You build it out of range, as high as the city walls, or even higher, armour the front with hides, move it up and give your archers a fair chance to clear the city walls.
Here, for once, is a situation where archers are fighting archers as the main event in ancient Greece. Though siege-towers were constructed out of range, there could always be over-achievers: Philip II, king of Macedon (359-336) and father of Alexander the Great, was inspecting
siege-works when he got his most famous wound an arrow from the city walls knocked his eye out.
Archers on city walls turned many a tide, as victorious besiegers routed a city’s land forces, and, in the excitement of pursuit, got too close to the city walls!.
Size approx 33mm long. We have a very few similar all from the collection, this one in the gallery was sold but we have a very few very similar around the same size. However, some are slightly longer, and a larger size, that are up to £95, please enquire directly if required read more
65.00 GBP