
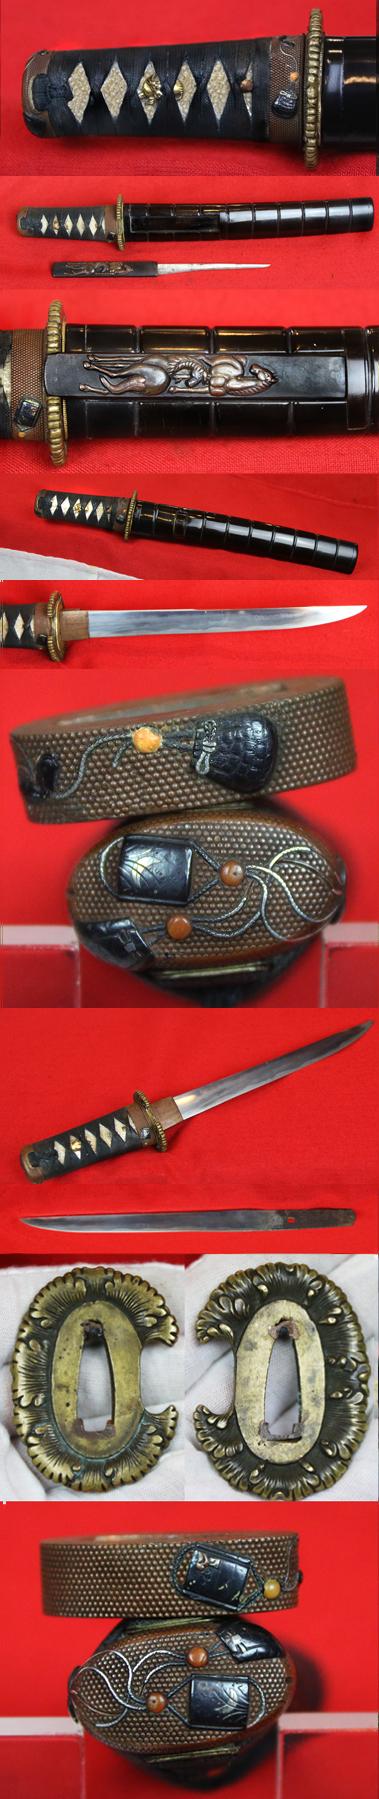
A Marvelous Museum Quality Samurai Tanto, 15th Century, Signed Sukesada, A Famous Line of Exemplary Master Swordsmiths That Continued From the 1400’s To The End of The Tokugawa Shogunate. This Wonderful Tanto is Around 600 Years Old
The great line of smiths that started in the 15th century when this sword was made, and continued until the end of the Tokugawa Shogunate in the 1860’s. {Tanto, despite being referred to as samurai daggers, are always traditionally regarded as ‘swords’, irrespective of length.}
This is truly a wondrous ancient armour piercing bladed samurai tanto from the mid 1400's, is signed Sukesada, and the beautiful hamon is very clear to see, and is an undulating gunome. Complete with all original Edo period fittings, tsukaito and saya.
The saya is of lobster scale ribbed roiro urushi lacquer, with matte lacquer at the bottom section of the saya.
Cherished for its infinite versatility, urushi is a distinctive art form that has spread across all facets of Japanese culture from the tea ceremony to the saya scabbards of samurai swords
Japanese artists created their own style and perfected the art of decorated lacquerware during the 8th century. Japanese lacquer skills reached its peak as early as the twelfth century, at the end of the Heian period (794-1185). This skill was passed on from father to son and from master to apprentice.
The varnish used in Japanese lacquer is made from the sap of the urushi tree, also known as the lacquer tree or the Japanese varnish tree (Rhus vernacifera), which mainly grows in Japan and China, as well as Southeast Asia. Japanese lacquer, 漆 urushi, is made from the sap of the lacquer tree. The tree must be tapped carefully, as in its raw form the liquid is poisonous to the touch, and even breathing in the fumes can be dangerous. But people in Japan have been working with this material for many millennia, so there has been time to refine the technique!
The fuchigashira mounts are fabulous quality, of multi coloured shakudo and silver decorated over a hand punched nanako ground with carved takebori inro, with pellets of inlaid coral representing the inro's himo mounted ojimi. An inrō (印籠, lit., "pillbox") is a traditional Japanese case for holding small objects, suspended from the samurai's obi worn around the waist when wearing kimono. They are often highly decorated, in a variety of materials and techniques, often using lacquer. The tsuba is a takebori carved with flower petals in incredible detail. The menuki are gold recumbant water buffalo. The tanto was designed primarily as a stabbing weapon, but the edge can be used for slashing as well. Tanto are generally forged in hira-zukuri style (without ridgeline), meaning that their sides have no ridge line and are nearly flat, unlike the shinogi-zukuri structure of a katana. Some tanto have particularly thick cross-sections for armour-piercing duty, and are called yoroi toshi. The tantos primary use was a type of stabbing weapon, however, the blade could also be used for slashing as well. Some tanto were forged with a particularly thick cross section which was thought to aid in piercing the armour of enemies, this type of dagger would be called a yoroi toshi.
A tanto would most often be worn by Samurai, and it was very uncommon to come across a non samurai with a tanto. It was not only men who carried these daggers, women would on occasions carry a small tanto called a kaiken in their obi which would be used for self-defence. In feudal Japan a tanto would occasionally be worn by Samurai in place of the wakizashi in a combination called the daisho, which roughly translates as big-little, in reference to the big Samurai Sword (Katana) and the small dagger (tanto). Before the rise of the katana it was more common for a Samurai to carry a tachi and tanto combination as opposed to a katana and wakizashi.
As once told to us by an esteemed regular visitor to us here in our gallery, and the same words that are repeated in his book;
“In these textures lies an extraordinary and unique feature of the sword - the steel itself possesses an intrinsic beauty. The Japanese sword has been appreciated as an art object since its perfection some time during the tenth century AD. Fine swords have been more highly prized than lands or riches, those of superior quality being handed down from generation to generation. In fact, many well-documented swords, whose blades are signed by their makers, survive from nearly a thousand years ago. Recognizable features of the blades of hundreds of schools of sword-making have been punctiliously recorded, and the study of the sword is a guide to the flow of Japanese history.”
Victor Harris
Curator, Assistant Keeper and then Keeper (1998-2003) of the Department of Japanese Antiquities at the British Museum. He studied from 1968-71 under Sato Kenzan, Tokyo National Museum and Society for the Preservation of Japanese Swords
Overall 13.5 inches long overall, 9.25 inch blade read more
7950.00 GBP
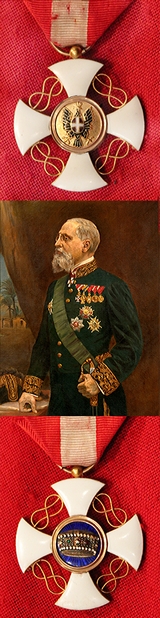
A Stunning Italian 'Order of the Crown of Italy' in Gold; Knight's Cross Medal. With Polychrome Transluscent Enamel Of The Crown Of Savoy
In Gold and enamels, 37 x 39mm, enamels superbly intact without chipping, original ribbon, extremely fine condition. Gold-edged white enamel cross pattee alisee with gold knots between the arms, on laterally-pierced ball suspension; the face with a circular central deep blue translucent enamel medallion bearing the gilt crown of Savoy with red, with white and green jewels, encircled by a gold ring; the reverse with a gold circular central medallion bearing a crowned black enamel eagle, an oval red enamel shield with a white enamel cross on its breast; The Order of the Crown of Italy was founded as a national order in 1868 by King Vittorio Emanuel II, to commemorate the unification of Italy in 1861. It was awarded in five degrees for civilian and military merit.
Compared with the older Order of Saints Maurice and Lazarus (1572), the Order of the Crown of Italy was awarded more liberally and could be conferred on non-Catholics as well; eventually, it became a requirement for a person to have already received the Order of the Crown of Italy in at least the same degree before receiving the Order of Saints Maurice and Lazarus.
The order has been suppressed by law since the foundation of the Republic in 1946. However, Umberto II did not abdicate his position as fons honorum and it remained under his Grand Mastership as a dynastic order. While the continued use of those decorations conferred prior to 1951 is permitted in Italy, the crowns on the ribbons issued before 1946 must be substituted for as many five pointed stars on military uniforms. Following the demise of the last reigning monarch in 1983, the order, founded by the first, is no longer bestowed. Notable recipients of the order were; Major General Robert A. McClure, father of U.S. Army Special Operations, Director of Information and Media Control at Supreme Headquarters Allied Expeditionary Force (SHAEF) during World War II
Brigadier General Billy Mitchell, United States Army air power advocate.
Charles Poletti, Governor of New York, and Colonel in the United States Army; served in Italy during World War II. Painting in the gallery by Karel Zadnik (1847-1929), painted in Bilowitz in 1912 of Count Hugo II Logothetti who is wearing his Italian Order of the Crown of Italy around his neck. Silk ribbon with small old staining. read more
225.00 GBP
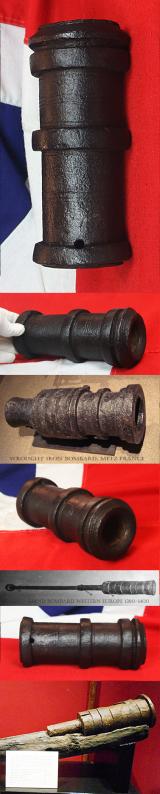
A Very Fine, Late Middle Ages, Early Hand-Bombard, Iron Mortar Cannon. The Earliest Form of Ignition Battle Weapon That Developed into The Hand Pistole & Blunderbuss
Used in both the field of combat or from a castle battlement. This fine piece would make a wonderful display piece, perhaps set on a small plinth. Ideal for a desk, bookshelf or mantle.
The weapon that provided the name to the Royal Artillery rank of bombardier, and the word 'bombardment'.
A hand bombard was the larger version of the handgonne or hand cannon, yes still a good size for handling.
Small enough and light enough to be manoeuvred by hand and thus then loosely fixed, or semi-permanently fixed, in either an L shaped wooden block and used like a mortar, or, onto a length of sturdy wooden haft, from three feet to five foot long to be used almost musket like and bound with wrought iron bands see illustration in the photo gallery of these medievil variations of mounting. The precursor to the modern day pistol and musket from which this form of ancient so called handgonne developed into over the centuries. It is thought that gunpowder was invented in China and found its way to Europe in the 13th Century. In the mid to late 13th Century gunpowder began to be used in cannons and handguns, and by the mid 14th Century they were in relatively common use for castle sieges. By the end of the 14th Century both gunpowder, guns and cannon had greatly evolved and were an essential part of fortifications which were being modified to change arrow slits for gun loops. Bombards and Hand cannon' date of origin ranges around 1350. Hand bombards and hand cannon were relatively inexpensive to manufacture, but the skill required to make them was considerable, but they were not that accurate to fire. Nevertheless, they were employed for their shock value. In 1492 Columbus carried one on his discovery exploration to the Americas.
Conquistadors Hernando Cortez and Francisco Pizzaro also used them, in 1519 and 1533, during their respective conquests and colonization of Mexico and Peru. Not primary arms of war, hand bombards and hand cannon were adequate tools of protection for fighting men.
See Funcken, L. & Funcken F., Le costume, l'armure et les armes au temps de la chevalerie, de huitieme au quinzieme siecle, Tournai,1977, pp.66-69, for reconstruction of how such hand cannons were used.
At the beginning of the 14th century, among the infantry troops of the Western Middle Ages, developed the use of manual cannons (such as the Italian schioppetti, spingarde, and the German Fusstbusse).
Photo of the hand bombard recovered from the well at Cardiff Castle, by Simon Burchell - Own work
External width at the muzzle 3.25 inches, length 8 inches. Weight 10.2 pounds read more
2695.00 GBP

Wonderful High Grade, Samurai Dagger From The Koto Era, Armour PiercingTanto By Kanesada. A Tanto of Likely A Highest Ranked Retainer of the Great Takeda Shingen 武田 信玄 & Bearing His Silver Mon {Crest}. Around 500 Years Old
Likely used by a high ranking samurai retainer in service of the great samurai commander of legend, Takeda Shingen, and bearing his clan mon menuki upon the tsuka {hilt} beneath the tsuka-ito {silk wrap}.
Takeda Shingen (武田 信玄, December 1, 1521 – May 13, 1573) was daimyo lord of Kai Province during the Sengoku period of Japan. Known as the "Tiger of Kai", he was one of the most powerful daimyo of the late Sengoku period, and credited with exceptional military prestige. Shingen was based in a poor area with little arable land and no access to the sea, but he became one of Japan's leading daimyo. His skills are highly esteemed and on par with Mōri Motonari.
The blade had a few small surface marks that we had removed by a Japanese trained artisan and it now looks incredible
Armour piercing Koto blade circa 1530, with superb original Edo period fittings koshirae, including silver copper alloy mounts and a gilt dragon saya ornament. Hammered gold over copper alloy oval tsuba, and silver clan mon menuki within the tsuka hilt wrap of the four interlocking diamonds of Takeda Shingen's clan.
The saya is decorated in superb cinnabar lacquer, the favoured colour and symbol of Takeda Shingen his armour was entirely based on this colour and the tsuka wrapped in black silk over Takeda kamon on giant rayskin.
In 1548, Shingen defeated Ogasawara Nagatoki in the Battle of Shiojiritoge and then took Fukashi in 1550.
After conquering Shinano, Shingen faced another rival, Uesugi Kenshin of Echigo. The feud between them became legendary, and they faced each other on the battlefield five times in the Battles of Kawanakajima. These battles were generally confined to controlled skirmishes, neither daimyo willing to devote himself entirely to a single all-out attempt. The conflict between the two that had the fiercest fighting, and might have decided victory or defeat for one side or the other, was the fourth battle, during which the famous tale arose of Uesugi Kenshin's forces clearing a path through the Takeda troops and Kenshin engaging Shingen in single combat. The tale has Kenshin attacking Shingen with his sword while Shingen defends with his iron war fan or tessen. Both lords lost many men in this fight, and Shingen in particular lost two of his main generals, Yamamoto Kansuke and his younger brother Takeda Nobushige. In 1563, allied with Hojo Ujiyasu, he captured Matsuyama Castle in Musashi Province. Takeda Shingen then took Kuragano in 1565 and Minowa Castle. He then moved against the Hojo by attacking Hachigata Castle then engaged in the Siege of Odawara (1569). He successfully withdrew after Hojo Ujiteru and Hojo Ujikuni failed to stop him in the Battle of Mimasetoge.Shingen and Tokugawa Ieyasu "came to terms" and occupied the "former Imagawa territory." They both fought against Yoshimoto's heir, Imagawa Ujizane. After defeating the intervention forces commanded by Hojo Ujimass of Sagami, Shingen finally secured the Suruga, formerly base of the prestigious Imagawa clan, as a Takeda asset in 1569.
Upon securing Takeda control over Suruga, northern Shinano, and western Kozuke, Shingen moved to challenge the Oda-Tokugawa alliance, leading a formidable force of over 30,000 into the latter's territories in Totomi, Mikawa, and Mino in 1572.
Photo number 8 in the gallery show the blade now looking stunning, the previous photos in the gallery show it prior to the professional attention undertaken, to show how much it has improved.
As once told to us by an esteemed regular visitor to us here in our gallery, and the same words that are repeated in his book;
“In these textures lies an extraordinary and unique feature of the sword - the steel itself possesses an intrinsic beauty. The Japanese sword has been appreciated as an art object since its perfection some time during the tenth century AD. Fine swords have been more highly prized than lands or riches, those of superior quality being handed down from generation to generation. In fact, many well-documented swords, whose blades are signed by their makers, survive from nearly a thousand years ago. Recognizable features of the blades of hundreds of schools of sword-making have been punctiliously recorded, and the study of the sword is a guide to the flow of Japanese history.”
Victor Harris
Curator, Assistant Keeper and then Keeper (1998-2003) of the Department of Japanese Antiquities at the British Museum. He studied from 1968-71 under Sato Kenzan, Tokyo National Museum and Society for the Preservation of Japanese Swords read more
6995.00 GBP

A Superb Original 12th Century Crusader Knights Templar Medieval Knight's Dagger, A Shortened Knightly Sword, with Crucifix Hilt. The Blade Bears The Remains of a Templar Cross, Inlaid, in Gold Alloy Latten, Upon One Blade Face Below The Hilt
Originally made for and used by a Knights Templar, Knight Hospitaller, in the early 12th century as a sword, then, in or around the the same century it was damaged, and reformed by a skilled sword smith, it was shortened and then used as a knightly dagger, very likely continually until the reign of King Henry Vth into the Battle of Agincourt era circa 1415.
Possibly damaged in the second crusade, retained as a family heirloom and historic treasure, to be used as a crucifix form hilted knightly dagger. A millennia ago it would have had a wooden handle but long since rotted away.
See photo 7 in the gallery to show a carved grave stone of a crusader knight who has a the same form of shortened sword cruciform hilted dagger upon his right thigh.
This wonderful original Medieval period antiquity would make a spectacular centre-piece to any new or long established fine collection, or indeed a magnificent solitary work of historical art, for any type of decor both traditional or contemporary. What a fabulous original ‘statement piece’ for any collection or decor. In the world of collecting there is so little remaining in the world from this highly significant era in European and British history. And to be able to own and display such an iconic original representation from this time is nothing short of a remarkable privilege. A wonderful example piece, from the ancient knightly age. Effectively, from this time of almost a thousand years ago, from a collectors point of view, little else significant survives at all, only the odd small coin, ring, or, very rarely seen, and almost impossible to own, carved statuary.
This fabulous dagger was reformed in the medieval crusades period by cutting down the upper third of the sword; the blade being broad, with shallow fuller and square shoulders, the guard narrow and tapering towards the ends; it bears a later formed 'acorn' style pommel. See Oakeshott, E., Records of the Medieval Sword, Woodbridge, 1991. 942 grams, 47cm (18 1/2"). From a private family collection; previously acquired from a collection formed before 1990; thence by descent. The weapon started life as a two-edged sword, probably of Oakeshott's Type XV with broad tang and narrow guard. There is a trace of crucifix, inlay, in latten, a gold-bronze alloy, below the shoulder to one face, which likely was a templar crucifix symbol. {see photo 9 in the gallery}
It is likely that the sword was damaged in combat at the time of the post Norman conquests of England, and thereafter, in the early second crusades, and using the damaged knight's long sword, probably in combat during the second crusade in the Holy Land, a large knightly dagger was created, by removing the unusable part, and re-pointing the shortened blade.
This superb piece could only be used by the rank and status of Templar Knight, or, such as Knight Hospitallar ,as the lower orders below knight, were not permitted the use or ownership of fine knightly form swords or daggers
The Knights Templar were an elite fighting force of their day, highly trained, well-equipped, and highly motivated; one of the tenets of their religious order was that they were forbidden from retreating in battle, unless outnumbered three to one, and even then only by order of their commander, or if the Templar flag went down. Not all Knights Templar were warriors. The mission of most of the members was one of support – to acquire resources which could be used to fund and equip the small percentage of members who were fighting on the front lines. There were actually three classes within the orders. The highest class was the knight. When a candidate was sworn into the order, they made the knight a monk. They wore white robes. The knights could hold no property and receive no private letters. They could not be married or betrothed and could not have any vow in any other Order. They could not have debt more than they could pay, and no infirmities. The Templar priest class was similar to the modern day military chaplain. Wearing green robes, they conducted religious services, led prayers, and were assigned record keeping and letter writing. They always wore gloves, unless they were giving Holy Communion. The mounted men-at-arms represented the most common class, and they were called "brothers". They were usually assigned two horses each and held many positions, including guard, steward, squire or other support vocations. As the main support staff, they wore black or brown robes and were partially garbed in chain mail or plate mail. The armour was not as complete as the knights. Because of this infrastructure, the warriors were well-trained and very well armed. Even their horses were trained to fight in combat, fully armoured. The combination of soldier and monk was also a powerful one, as to the Templar knights, martyrdom in battle was one of the most glorious ways to die.
The Templars were also shrewd tacticians, following the dream of Saint Bernard who had declared that a small force, under the right conditions, could defeat a much larger enemy. One of the key battles in which this was demonstrated was in 1177, at the Battle of Montgisard. The famous Muslim military leader Saladin was attempting to push toward Jerusalem from the south, with a force of 26,000 soldiers. He had pinned the forces of Jerusalem's King Baldwin IV, about 500 knights and their supporters, near the coast, at Ascalon. Eighty Templar knights and their own entourage attempted to reinforce. They met Saladin's troops at Gaza, but were considered too small a force to be worth fighting, so Saladin turned his back on them and headed with his army towards Jerusalem.
Once Saladin and his army had moved on, the Templars were able to join King Baldwin's forces, and together they proceeded north along the coast. Saladin had made a key mistake at that point – instead of keeping his forces together, he permitted his army to temporarily spread out and pillage various villages on their way to Jerusalem. The Templars took advantage of this low state of readiness to launch a surprise ambush directly against Saladin and his bodyguard, at Montgisard near Ramla. Saladin's army was spread too thin to adequately defend themselves, and he and his forces were forced to fight a losing battle as they retreated back to the south, ending up with only a tenth of their original number. The battle was not the final one with Saladin, but it bought a year of peace for the Kingdom of Jerusalem, and the victory became a heroic legend.
Another key tactic of the Templars was that of the "squadron charge". A small group of knights and their heavily armed warhorses would gather into a tight unit which would gallop full speed at the enemy lines, with a determination and force of will that made it clear that they would rather commit suicide than fall back. This terrifying onslaught would frequently have the desired result of breaking a hole in the enemy lines, thereby giving the other Crusader forces an advantage.
The Templars, though relatively small in number, routinely joined other armies in key battles. They would be the force that would ram through the enemy's front lines at the beginning of a battle, or the fighters that would protect the army from the rear. They fought alongside King Louis VII of France, and King Richard I of England. In addition to battles in Palestine, members of the Order also fought in the Spanish and Portuguese Reconquista.
According to author S.Tibble, and in his new book, Templars, the Knights Who Made Britain, he details a very convincing and gripping history, that the Templars, famous for their battles on Christendom’s eastern front, were in fact dedicated peace-mongers at home. They influenced royal strategy and policy, created financial structures, and brokered international peace treaties—primarily to ensure that men, money, and material could be transferred more readily to the east.
Charting the rise of the Order under Henry I through to its violent suppression following the fall of Acre, Tibble argues that these medieval knights were essential to the emergence of an early English state. Revealing the true legacy of the British Templars, he shows how a small group helped shape medieval Britain while simultaneously fighting in the name of the Christian Middle East
This dagger would have likely been used continually past the era of King Richard for another 200 years into to the 1400's, past the Battle of Crecy and into the Battle of Agincourt era, for knightly swords and daggers were extraordinarily valuable, and simply never discarded unless they were too damaged to use and beyond repair. From the time after Agincourt, knightly dagger patterns changed to become longer and much narrower, with considerably smaller guards. There were three main later dagger types then, called called rondel, ear and ballock. Almost every iron weapon that has survived today from this era is now in a fully russetted condition, as is this one, because only some of the swords of kings, that have been preserved in national or Royal collections are today still in a fairly good state of preservation and condition. This dagger is certainly in good condition for its age, it’s cross guard is, as usual, mobile, as organic wooden grips almost never survive in weapons of such great age.
Daggers bespoke made or adapted from earlier long swords of this form were clearly used well into the age of Henry Vth as carved marble and stone tombs, or monumental brasses, covering buried knights within churches and cathedrals are often adorned in full armour combined with such knightly daggers and swords, and they are also further depicted at the time in illuminated manuscripts or paintings of knightly battles such as of Crecy, Poitiers and Agincourt at the time. read more
5350.00 GBP

A Finely Detailed Original Ancient Egyptian Shabti a Representation of a Mummified Human Tomb Figure, The Afterlife Servant of the Mummy, in Faience Blue Glazed Late Period, Dynasty XXVI, 664-525 B. C. From the Tomb of the Female Owner Bastet-ir-dis
Around 2500 years old. One of two we acquired, excavated from a tomb, and part of a collection formed before the 1970's. A light blue and green composition shabti comprising the remaining upper body, head and shoulders with crossed arms holding crook and flail, wearing a tripartite wig and false beard, semi-naturalistic detailing to the faces. A shabti (also known as shawabti or ushabti) is a generally mummiform small figurine found in many ancient Egyptian tombs. They are commonly made of blue or green glazed Egyptian faience, but can also consist of stone, wood, clay, metal, and glass.
We had two previously from the same collector that bore an inscription {these latest pair are not inscribed, but came from the same tomb} that included the name of the female owner Bastet-ir-dis (which can be translated as 'it was Bastet who gave it' i.e. the lady was the gift of the goddess Bastet), highlights the popularity of this feline deity during the Late Period and Ptolemaic/Roman times. Bastet was a protector of the sun god Re as well as being associated with motherhood and fertility. Bastet-ir-dis's name is preceded by 'the Osiris', a common appellation in shabti inscriptions of this and earlier periods, which associates the deceased with the preeminent ancient Egyptian god of the Underworld. The name was followed by the epithet 'true of voice' or 'justified', an attestation of the deceased's good character as judged by a divine tribunal that decided whether a person could enter the eternal Hereafter. Then follows the phrase 'born to' which would have been accompanied by the name of Bastet-ir-dis's mother on the now missing portion of these figures.
We show two other shabti found in other tombs of the children of Bastet-ir-dis, plus amazingly the actual sarcophagus of Bastit-ir-dis sold at Christies over 20 years ago, in 2001, for $30,550. Original Egyptian Sarcophagus have increased in desirability in the past 20 odd years exponentially, with some fetching as high as $1,000,000 {likely due because it is now forbidden to remove all antiquities from Egypt}
National Museum of Liverpool Shabti of Psamtek born of Bastet-ir-dis
664 BC - 525 BC (Dynasty 26)
British Museum number
Shabti of Padipep
Named in inscription: Bastet-ir-dis (born of)
An Ancient Egyptian painted Wood Anthropoid Sarcophagus of Bastet-ir-dis
Late Period, Dynasty XXVI, 664-525 B. C.
Gessoed and painted depicting the deceased, the lady Bastet-irdis, wearing a striated vulture cap covered wig, and a falcon terminated broad collar, the entire surface of the lid with mythological vignettes, funerary deities and their accompanying inscriptions, the principle among which are a kneeling, winged Isis, and the deceased on a bier; the join of the lid to the box decorated with an undulating serpent, the box with two long funerary offering formulae for the benefit of Bastet-irdis, the back with a profile figure of the "Goddess of the West" Sold originally in the Antiquitie sale, Sotheby's London, 8 December 1994, lot 100
The inscription includes the name of the female owner Bastet-ir-dis (which can be translated as 'it was Bastet who gave it' i.e. the lady was the gift of the goddess Bastet), highlights the popularity of this feline deity during the Late Period and Ptolemaic/Roman times. Bastet was a protector of the sun god Re as well as being associated with motherhood and fertility. Bastet-ir-dis's name is preceded by 'the Osiris', a common appellation in shabti inscriptions of this and earlier periods, which associates the deceased with the preeminent ancient Egyptian god of the Underworld. The name is followed by the epithet 'true of voice' or 'justified', an attestation of the deceased's good character as judged by a divine tribunal that decided whether a person could enter the eternal Hereafter. Then follows the phrase 'born to' which would have been accompanied by the name of Bastet-ir-dis's mother on the now missing portion of these figures.
The meaning of the Egyptian term is still debated, however one possible translation is ‘answerer’, as they were believed to answer their master’s call to work in the afterlife. Since the Fourth Dynasty (2613–2494 BC), for instance, the deceased were buried with servant statuettes like bakers and butchers, providing their owners with eternal sustenance. after the death of Cleopatra in around 37 b.c. and the close of the Ptolomeic Dynasty, no shabti were produced for service in Egyptian mummy's tombs. A spell was oft written on the shabti so that it would awaken as planned, this is the 'shabti spell' from chapter six of the Book of the Dead and reads as follows:
"O shawabti, if name of deceased is called upon,
If he is appointed to do any work which is done on the necropolis,
Even as the man is bounden, namely to cultivate the fields,
To flood the river-banks or to carry the sand of the East to the West,
And back again, then 'Here am I!' you shall say"1
2,000 to 2300 years old. From the Last pharoes of Egypt, that lasted for 275 years, up to the era of Julius Caeser, Cleopatra and Mark Anthony. With The last pharoah almost being the son of Julius Caeser, Caesarian but his mother famously committed suicide, and with the death of Cleopatra, thus the pharoic dynasties ended. Egyptian Blue Glazed Faience Ptolemaic dynasty sometimes referred to as the Lagid dynasty after Ptolemy I's father, who was a Macedonian Greek
The royal dynasty which ruled the Ptolemaic Kingdom in Ancient Egypt during the Hellenistic period. Their rule lasted for 275 years, from 305 to 30 BC. The Ptolemaic was the last dynasty of ancient Egypt.
Ptolemy, one of the seven somatophylakes (bodyguard companions), a general and possible half-brother of Alexander the Great was appointed satrap of Egypt after Alexander's death in 323 BC. In 305 BC, he declared himself Pharaoh Ptolemy I, later known as Sōter "Saviour". The Egyptians soon accepted the Ptolemies as the successors to the pharaohs of independent Egypt. Ptolemy's family ruled Egypt until the Roman conquest of 30 BC.
Like the earlier dynasties of ancient Egypt, the Ptolemaic dynasty practised inbreeding including sibling marriage, but this did not start in earnest until nearly a century into the dynasty's history. All the male rulers of the dynasty took the name Ptolemy, while queens regnant were all called Cleopatra, Arsinoe or Berenice. The most famous member of the line was the last queen, Cleopatra VII, known for her role in the Roman political battles between Julius Caesar and Pompey, and later between Octavian and Mark Antony. Her apparent suicide at the conquest by Rome marked the end of Ptolemaic rule in Egypt.
Richard Lassels, an expatriate Roman Catholic priest, first used the phrase “Grand Tour” in his 1670 book Voyage to Italy, published posthumously in Paris in 1670. In its introduction, Lassels listed four areas in which travel furnished "an accomplished, consummate traveler" with opportunities to experience first hand the intellectual, the social, the ethical, and the political life of the Continent.
The English gentry of the 17th century believed that what a person knew came from the physical stimuli to which he or she has been exposed. Thus, being on-site and seeing famous works of art and history was an all important part of the Grand Tour. So most Grand Tourists spent the majority of their time visiting museums and historic sites.
Once young men began embarking on these journeys, additional guidebooks and tour guides began to appear to meet the needs of the 20-something male and female travelers and their tutors traveling a standard European itinerary. They carried letters of reference and introduction with them as they departed from southern England, enabling them to access money and invitations along the way.
With nearly unlimited funds, aristocratic connections and months or years to roam, these wealthy young tourists commissioned paintings, perfected their language skills and mingled with the upper crust of the Continent.
The wealthy believed the primary value of the Grand Tour lay in the exposure both to classical antiquity and the Renaissance, and to the aristocratic and fashionably polite society of the European continent. In addition, it provided the only opportunity to view specific works of art, and possibly the only chance to hear certain music. A Grand Tour could last from several months to several years. The youthful Grand Tourists usually traveled in the company of a Cicerone, a knowledgeable guide or tutor.
The ‘Grand Tour’ era of classical acquisitions from history existed up to around the 1850’s, and extended around the whole of Europe, Egypt, the Ottoman Empire, and the Holy Land.
1.3/4"). Fair condition very old repair to mid section. read more
395.00 GBP

A Finally Detailed Original Ancient Egyptian Shabti a Representation of a Mummified Human Tomb Figure, The Afterlife Servant of the Mummy, in Faience Blue Glazed Late Period, Dynasty XXVI, 664-525 B. C. From the Tomb of the Female Owner Bastet-ir-dis
Around 2500 years old. One of two we acquired, for sale seperately, excavated from a tomb, and part of a collection formed before the 1970's. A light blue and green composition shabti comprising the remaining upper body, head and shoulders with crossed arms holding crook and flail, wearing wig and false beard, semi-naturalistic detailing to the faces.
We had two previously from the same collector that bore an inscription {these latest pair are not inscribed, but came from the same tomb} that included the name of the female owner Bastet-ir-dis (which can be translated as 'it was Bastet who gave it' i.e. the lady was the gift of the goddess Bastet), highlights the popularity of this feline deity during the Late Period and Ptolemaic/Roman times. Bastet was a protector of the sun god Re as well as being associated with motherhood and fertility. Bastet-ir-dis's name is preceded by 'the Osiris', a common appellation in shabti inscriptions of this and earlier periods, which associates the deceased with the preeminent ancient Egyptian god of the Underworld. The name was followed by the epithet 'true of voice' or 'justified', an attestation of the deceased's good character as judged by a divine tribunal that decided whether a person could enter the eternal Hereafter. Then follows the phrase 'born to' which would have been accompanied by the name of Bastet-ir-dis's mother on the now missing portion of these figures.
We show two other shabti found in other tombs of the children of Bastet-ir-dis, plus amazingly the actual sarcophagus of Bastit-ir-dis sold at Christies over 20 years ago, in 2001, for $30,550. Original Egyptian Sarcophagus have increased in desirability in the past 20 odd years exponentially, with some fetching as high as $1,000,000 {likely due because it is now forbidden to remove all antiquities from Egypt}
National Museum of Liverpool Shabti of Psamtek born of Bastet-ir-dis
664 BC - 525 BC (Dynasty 26)
British Museum number
Shabti of Padipep
Named in inscription: Bastet-ir-dis (born of)
An Ancient Egyptian painted Wood Anthropoid Sarcophagus of Bastet-ir-dis
Late Period, Dynasty XXVI, 664-525 B. C.
Gessoed and painted depicting the deceased, the lady Bastet-irdis, wearing a striated vulture cap covered wig, and a falcon terminated broad collar, the entire surface of the lid with mythological vignettes, funerary deities and their accompanying inscriptions, the principle among which are a kneeling, winged Isis, and the deceased on a bier; the join of the lid to the box decorated with an undulating serpent, the box with two long funerary offering formulae for the benefit of Bastet-irdis, the back with a profile figure of the "Goddess of the West" Sold originally in the Antiquitie sale, Sotheby's London, 8 December 1994, lot 100
The inscription includes the name of the female owner Bastet-ir-dis (which can be translated as 'it was Bastet who gave it' i.e. the lady was the gift of the goddess Bastet), highlights the popularity of this feline deity during the Late Period and Ptolemaic/Roman times. Bastet was a protector of the sun god Re as well as being associated with motherhood and fertility. Bastet-ir-dis's name is preceded by 'the Osiris', a common appellation in shabti inscriptions of this and earlier periods, which associates the deceased with the preeminent ancient Egyptian god of the Underworld. The name is followed by the epithet 'true of voice' or 'justified', an attestation of the deceased's good character as judged by a divine tribunal that decided whether a person could enter the eternal Hereafter. Then follows the phrase 'born to' which would have been accompanied by the name of Bastet-ir-dis's mother on the now missing portion of these figures.
A shabti (also known as shawabti or ushabti) is a generally mummiform small figurine found in many ancient Egyptian tombs. They are commonly made of blue or green glazed Egyptian faience, but can also consist of stone, wood, clay, metal, and glass. The meaning of the Egyptian term is still debated, however one possible translation is ‘answerer’, as they were believed to answer their master’s call to work in the afterlife. Since the Fourth Dynasty (2613–2494 BC), for instance, the deceased were buried with servant statuettes like bakers and butchers, providing their owners with eternal sustenance. after the death of Cleopatra in around 37 b.c. and the close of the Ptolomeic Dynasty, no shabti were produced for service in Egyptian mummy's tombs. A spell was oft written on the shabti so that it would awaken as planned, this is the 'shabti spell' from chapter six of the Book of the Dead and reads as follows:
"O shawabti, if name of deceased is called upon,
If he is appointed to do any work which is done on the necropolis,
Even as the man is bounden, namely to cultivate the fields,
To flood the river-banks or to carry the sand of the East to the West,
And back again, then 'Here am I!' you shall say"
2500 years old, the 26th dynasty 664-525 B.C. fortified the culture, which saw a new phase of artistic expression in stone monuments and statuary. Later generations would remember this dynasty as representative of Egyptian history, and would in turn recapitulate Saite forms. From the era around 200 years before the last pharoes of Egypt, known as the Ptolomeic Dynasty that lasted for 275 years, up to the era of Julius Caeser, Cleopatra and Mark Anthony. With The last pharoah almost being the son of Julius Caeser, Caesarian but his mother famously committed suicide, and with the death of Cleopatra, thus the pharoic dynasties ended.
The Ptolemaic dynasty is sometimes referred to as the Lagid dynasty after Ptolemy I's father, who was a Macedonian Greek
The royal dynasty which ruled the Ptolemaic Kingdom in Ancient Egypt during the Hellenistic period. Their rule lasted for 275 years, from 305 to 30 BC. The Ptolemaic was the last dynasty of ancient Egypt.
Ptolemy, one of the seven somatophylakes (bodyguard companions), a general and possible half-brother of Alexander the Great was appointed satrap of Egypt after Alexander's death in 323 BC. In 305 BC, he declared himself Pharaoh Ptolemy I, later known as Sōter "Saviour". The Egyptians soon accepted the Ptolemies as the successors to the pharaohs of independent Egypt. Ptolemy's family ruled Egypt until the Roman conquest of 30 BC.
Like the earlier dynasties of ancient Egypt, the Ptolemaic dynasty practiced inbreeding including sibling marriage, but this did not start in earnest until nearly a century into the dynasty's history. All the male rulers of the dynasty took the name Ptolemy, while queens regnant were all called Cleopatra, Arsinoe or Berenice. The most famous member of the line was the last queen, Cleopatra VII, known for her role in the Roman political battles between Julius Caesar and Pompey, and later between Octavian and Mark Antony. Her apparent suicide at the conquest by Rome marked the end of Ptolemaic rule in Egypt.
Grand Tour souvenirs included a wide variety of sculpture, paintings, and antiquities, and led to Egyptian artefacts being found in the most unexpected places. Today’s visitors to historic houses, like those managed by the National Trust in Great Britain, may encounter an incongruous Egyptian item, like the top part of a small basalt figure, described as a nomarch, on a bedroom chimneypiece at Petworth House, Sussex, or the kneeling statue of Ramesses II on the staircase at The Vyne, Hampshire. Quite possibly, there will be no indication of the object’s age, origins, or purpose. If the visitor is lucky, they will find a display label, or an entry in a guidebook or online catalogue, but the history behind the object’s presence is more commonly unexplained.
Richard Lassels, an expatriate Roman Catholic priest, first used the phrase “Grand Tour” in his 1670 book Voyage to Italy, published posthumously in Paris in 1670. In its introduction, Lassels listed four areas in which travel furnished "an accomplished, consummate traveler" with opportunities to experience first hand the intellectual, the social, the ethical, and the political life of the Continent.
The English gentry of the 17th century believed that what a person knew came from the physical stimuli to which he or she has been exposed. Thus, being on-site and seeing famous works of art and history was an all important part of the Grand Tour. So most Grand Tourists spent the majority of their time visiting museums and historic sites.
Once young men began embarking on these journeys, additional guidebooks and tour guides began to appear to meet the needs of the 20-something male and female travelers and their tutors traveling a standard European itinerary. They carried letters of reference and introduction with them as they departed from southern England, enabling them to access money and invitations along the way.
With nearly unlimited funds, aristocratic connections and months or years to roam, these wealthy young tourists commissioned paintings, perfected their language skills and mingled with the upper crust of the Continent.
The wealthy believed the primary value of the Grand Tour lay in the exposure both to classical antiquity and the Renaissance, and to the aristocratic and fashionably polite society of the European continent. In addition, it provided the only opportunity to view specific works of art, and possibly the only chance to hear certain music. A Grand Tour could last from several months to several years. The youthful Grand Tourists usually traveled in the company of a Cicerone, a knowledgeable guide or tutor.
The ‘Grand Tour’ era of classical acquisitions from history existed up to around the 1850’s, and extended around the whole of Europe, Egypt, the Ottoman Empire, and the Holy Land.
1 1/2" inches high. Fair condition. read more
445.00 GBP

An Original Ancient Egyptian Shabti, The Afterlife Servant of The Mummy, Partial Blue-Glazed Faience 664 to 332 BC
A stunning Grand Tour artefact.
Much of our Grand Tour historic artefacts were originally acquired by a noble Scottish family in the 1820's while on a Grand Tour of the Middle East and the Holy Land, plus Anglo French battle sites within Northern & Western France from Azincourt, in the Pas-de-Calais, to Poitiers in Aquitaine. And the great classical battle sites of Ancient Rome and Greece.
The Scottish 10th Duke of Hamilton, the world renown Grand Tour collector, especially of ancient Egyptian pieces. He was the Ambassador to Catherine the Great as well as being Lord High Steward to both King William IV and Queen Victoria. He was so enamoured with his devotion to his collection of antiquities, he was mummified after his death, and buried in an ancient Egyptian sarcophagus within his family tomb.
From the 25th dynasty to the Late Period. One of a group of fine small tomb pieces we acquired. A shabti (also known as shawabti or ushabti) is a generally mummiform small figurine found in many ancient Egyptian tombs. They are commonly made of blue or green glazed Egyptian faience, but can also consist of stone, wood, clay, metal, and glass. The meaning of the Egyptian term is still debated, however one possible translation is ‘answerer’, as they were believed to answer their master’s call to work in the afterlife. Since the Fourth Dynasty (2613–2494 BC), for instance, the deceased were buried with servant statuettes like bakers and butchers, providing their owners with eternal sustenance. after the death of Cleopatra in around 37 b.c. and the close of the Ptolomeic Dynasty, no shabti were produced for service in Egyptian mummy's tombs. A spell was oft written on the shabti so that it would awaken as planned, this is the 'shabti spell' from chapter six of the Book of the Dead and reads as follows:
"O shawabti, if name of deceased is called upon,
If he is appointed to do any work which is done on the necropolis,
Even as the man is bounden, namely to cultivate the fields,
To flood the river-banks or to carry the sand of the East to the West,
And back again, then 'Here am I!' you shall say"
Piye established the Twenty-fifth Dynasty and appointed the defeated rulers as his provincial governors. He was succeeded first by his brother, Shabaka, and then by his two sons Shebitku and Taharqa. The reunited Nile valley empire of the 25th Dynasty was as large as it had been since the New Kingdom. Pharaohs of the dynasty, among them Taharqa, built or restored temples and monuments throughout the Nile valley, including at Memphis, Karnak, Kawa, and Jebel Barkal. The 25th Dynasty ended with its rulers retreating to their spiritual homeland at Napata. It was there (at El-Kurru and Nuri) that all 25th Dynasty pharaohs were buried under the first pyramids to be constructed in the Nile valley in hundreds of years
The Late Dynasty Period era;
The Twenty-Eighth Dynasty consisted of a single king, Amyrtaeus, prince of Sais, who successfully rebelled against the Persians, inaugurating Egypt's last significant phase of independence under native sovereigns. He left no monuments with his name. This dynasty reigned for six years, from 404 BC–398 BC.
The Twenty-Ninth Dynasty ruled from Mendes, for the period from 398 to 380 BC. King Hakor of this dynasty was able to defeat a Persian invasion during his reign.
The Thirtieth Dynasty took their art style from the Twenty-Sixth Dynasty. A series of three pharaohs ruled from 380 to 343 BC. The first king of the dynasty, Nectanebo I, defeated a Persian invasion in 373 BC. His successor Teos subsequently led an expedition against the Achaemenid Empire in the Near East. The expedition was beginning to meet with some success. unfortunately for Teos, his brother Tjahapimu was plotting against him. Tjahapimu convinced his son Nectanebo II to rebel against Teos and to make himself pharaoh. The plan was successful and the betrayed Teos had no alternative but to flee and the expedition disintegrated. The final ruler of this dynasty, and the final native ruler of Egypt, was Nectanebo II who was defeated in battle leading to the re-annexation by the Achaemenid Empire.
31st Dynasty
Main article: Thirty-first Dynasty of Egypt
The Second Achaemenid Period saw the re-inclusion of Egypt as a satrapy of the Persian Empire under the rule of the Thirty-First Dynasty, (343–332 BC) which consisted of three Persian emperors who ruled as Pharaoh - Artaxerxes III (343–338 BC), Artaxerxes IV (338–336 BC), and Darius III (336–332 BC) - interrupted by the revolt of the non-Achaemenid Khababash (338–335 BC). Persian rule in Egypt ended with the defeat of the Achaemenid Empire by Alexander the Great, who accepted the surrender of the Persian satrap of Egypt Mazaces in 332BC, and marking the beginning of Hellenistic rule in Egypt, which stabilized after Alexander's death into the Ptolemaic Kingdom.
2.5 inches long read more
285.00 GBP
Archaic Zhou Dynasty Bronze Halberd or ‘Ge’ of a Zhou Dynasty Charioteer, Circa 5th Century BC. Used By a Warrior In the Period of the Great Military Doctrine 'The Art of War' by General Sun-Tzu
This is the very type of original ancient ceremonial halbard, defined by the ancient Chinese as a dagger axe 'Ge' and exactly the type as used by the warriors serving under the world renowned General Sun Tzu, in the Kingdom of Wu, who is thought by many to be the finest general, philosopher and military tactician who ever lived. His 2500 year old book on the methods of warfare, tactics and psychology are still taught and highly revered in practically every officer training college throughout the world.
In excavated condition, cast in one piece, slightly curved terminal blade of thin flattened-diamond section, pierced along a basal flange with three slots, with fabulous areas of crystallized malachite, blue/green patina.
We also show in the gallery a schematic of how this 'Ge' halbard would have been mounted 2500 odd years ago on its long haft, and used by a charioteer warrior, there is also one depicted being carried in a painting that we show in the gallery being used in a chariot charge in the Zhou dynasty.
This is a superb original ancient piece from one of the great eras of Chinese history. it is unsigned but near identical to another that was signed and inscribed with details that have now been fully translated, deciphered and a few years ago shown at Sothebys New York estimated to a sale value of $300,000. Its research details are fully listed below, and it is photographed within our gallery for the viewers comparison. Naturally, our un-inscribed, but still, very rare original version, from the same era and place, is a much more affordable fraction of this price
The signed and named Sotheby's of New York example that we show in the gallery, was formerly made for its original warrior owner, Qu Shutuo of Chu, it is from the same period and in similar condition as ours. We reference it's description below, and it is photographed within the gallery, it is finely cast with the elongated yuan divided by a raised ridge in the middle of each side and extending downward to form the hu, inscribed to one side with eight characters reading Chu Qu Shutuo, Qu X zhisun, all bordered by sharply finished edges, the end pierced with three vertically arranged chuan (apertures), the nei with a further rectangular chuan and decorated with hook motifs, inscribed to one side with seven characters reading Chuwang zhi yuanyou, wang zhong, and the other side with five characters reading yu fou zhi X sheng, the surface patinated to a dark silver tone with light malachite encrustation
An Exhibition of Ancient Chinese Ritual Bronzes. Loaned by C.T. Loo & Co., The Detroit Institute of Arts, Detroit, 1940, pl. XXXIII.
New Orleans Museum of Art, New Orleans, March - June 1948.
This inscribed bronze halberd blade, although typical in form, is uniquely important as its inscription serves as a critical primary source that reveals the name of its original owner: Qu Shutuo of Chu. The only known close counterpart to this blade is a damaged bronze halberd blade, missing the yuan, and inscribed on the hu with seven characters, which can be generally translated to ‘for the auspicious use of Qu Shutuo of Chu’. That halberd is now in the collection of the Hunan Provincial Museum, Hunan, and published in Wu Zhenfeng, Shangzhou qingtongqi mingwen ji tuxiang jicheng Compendium of inscriptions and images of bronzes from Shang and Zhou dynasties, vol. 32, Shanghai, 2012, no. 17048
The remaining thirteen inscriptions can be translated as: 'Qu Shutuo of Chu, Qu X's grandson, yuanyou of the King of Chu'. Based on the inscription, the owner of this blade can be identified as such.
See for reference; The Junkunc Collection: Arts of Ancient China / Sotheby's New York
Lot 111
We also show in the gallery a photo of another similar halberd from a museum exhibition, of a Chinese ancient king bodyguard’s halberd gilt pole mounts for his personal charioteer
This is one of a stunning collection of original archaic bronze age weaponry we have just acquired. Many are near identical to other similar examples held in the Metropolitan in New York, the British royal collection, and such as the Hunan Provincial Museum, Hunan, China. As with all our items, every piece is accompanied by a certificate of authenticity. read more
1850.00 GBP

An Original, Roman Republic & Empire Period Bronze Dagger Pommel Ist Cent BC
A super, small collection of original, historical, Imperial Roman and Crusader's artefacts has just been acquired by us and will be added over the next week or so.
Made for, and used by, either a Roman noble, senator or gladiator. It may well even be the same form of dagger a pugio that was used to assassinate Julius Caesar on the Ides of March. The blade grip and scabbard have not survived as is more than usual. A superb Roman dagger mount from the historical time of Julius Caesar, the first Emperor, Augustus, Mark Anthony and Cleopatra, and last, but not least, Jesus of Nazareth. The Ides of March comes from the ides, a term the Romans used to note the middle of a month. Every month has an ides around the middle (as well as a calends at the beginning of the month and nones eight days before the ides). The Ides of March feels special for a couple of reasons: it's the day Caesar was murdered, and it's the subject of a soothsayer's spooky prophecy in William Shakespeare's Julius Caesar. Before Caesar, Roman nobility and military were free to plunder the provinces they ruled. But under Caesar, Rome controlled the process and sent inspectors to check up on everything, so they could only exploit their provinces under Caesar's supervision.
That slight was compounded by Caesar's rebranding of political real estate in his name ? he built statues in his image and renamed monuments for himself. He brought power to his family by giving them political appointments and honorifics, and drew allies outside the charmed circle of Roman nobility, like his soldiers and leaders in the provinces. As far as epic betrayals go, we tend to imagine Brutus in the same league as Judas. In reality, that infamy should be reserved for someone called Decimus.
Caesar trusted Decimus much more than he trusted Brutus ? and that made his betrayal more shocking. Misspelled in Shakespeare's Julius Caesar as "Decius," Decimus was much more important than most of us realize. "There were three leaders of the assassins' conspiracy, Brutus, Cassius, and Decimus." Decimus dined with Caesar the night before his assassination and convinced Caesar to leave his house the next morning (he was staying home because his wife, Calpurnia, was worried). Decimus' betrayal followed an adult life spent at Caesar's side. Brutus, however, had often fought against Caesar, like when he took Pompey's side against Caesar in the Civil War that lasted from 49 to 45 BC. He only came over to Caesar's side after a handsome cash award and profitable political appointment. When he was stabbed, most of the sources say he tried to get up and escape. Unfortunately for Caesar, the conspirators were trained soldiers, so they'd formed a tight perimeter. "They knew how you carry out an ambush,and some of the senators were assigned the job of crowd control."
As far as what Caesar said when he died, "Et tu, Brute" is a Renaissance invention. But Caesar did perform a few resonant gestures. He tried to escape, like any soldier would, but when death was near, he covered his face before he died. It may have been an attempt to preserve his dignity. Bibilography; Professor Strauss, Cornell, Classics and History. As with all our items it comes complete with our certificate of authenticity. read more
145.00 GBP